In Spring Boot, Job scheduler (Spring Boot Scheduler) is a feature that provides the facilities to automate the executions of tasks at specified interval. It is very useful in terms of running background jobs, periodic maintenance activity or any activity that needs to be performed.
Spring Boot supports various scheduling strategies which allows us to choose the most appropriate as per our requirements. Following are the main scheduling strategies which spring boot supports:
- Fixed Rate Scheduling
- Fixed Delay Scheduling
- Initial Delay
- Corn Expression Delay
Steps to implement scheduling in Spring Boot
Step 1- Create a new Spring Boot project
First of all, we will create a new Spring Boot project for implementing scheduling. To learn, please refer How to Create a Spring Boot Project?
Step 2- Project structure
In this tutorial, we are using the H2 database along with the following dependencies and project packaging structure.
<dependencies>
		<dependency>
			<groupId>org.springframework.boot</groupId>
			<artifactId>spring-boot-starter-data-jpa</artifactId>
		</dependency>
		<dependency>
			<groupId>org.springframework.boot</groupId>
			<artifactId>spring-boot-starter-web</artifactId>
		</dependency>

		<dependency>
			<groupId>org.springframework.boot</groupId>
			<artifactId>spring-boot-devtools</artifactId>
			<scope>runtime</scope>
			<optional>true</optional>
		</dependency>
		<dependency>
			<groupId>com.h2database</groupId>
			<artifactId>h2</artifactId>
			<scope>runtime</scope>
		</dependency>
		<dependency>
			<groupId>org.projectlombok</groupId>
			<artifactId>lombok</artifactId>
			<optional>true</optional>
		</dependency>
		<dependency>
			<groupId>org.springframework.boot</groupId>
			<artifactId>spring-boot-starter-test</artifactId>
			<scope>test</scope>
		</dependency>
	</dependencies>
We have following project structure:

Step 3: Create Pojo class
Now, we are required to create the model (pojo) class for our scheduler application.
import jakarta.persistence.Entity;
import jakarta.persistence.GeneratedValue;
import jakarta.persistence.Id;
import lombok.Data;
import lombok.ToString;

@Entity
@Data
@ToString
public class Message {

	@Id
	@GeneratedValue
	private int id;
	private String msg;

}
Step 4- Create Dao layer
We will be creating dao layer for spring scheduler application using Spring Data JPA.
import org.springframework.data.jpa.repository.JpaRepository;
import org.springframework.stereotype.Repository;

import com.paulsofts.spirngbootscheduler.data.Message;

@Repository
public interface MessageDao extends JpaRepository<Message, Integer> {

}
Step 5- Create Service layer
Now, we create the service class for our scheduler application. We have following two methods in the service layer:
- addMessage()
- It uses fixedRate scheduling and will add a message every 5 seconds.
- We are also logging the date and time to understand the scheduler behaviour.
- getMessage()
- This method fetches the data from the database, and we log the message data.
- For this, we are using the corn expression, which will fetch the record at 15 seconds every minute, every hour, every date, every month, and every day.
import java.util.Date;
import java.util.List;
import java.util.Random;

import org.apache.logging.log4j.LogManager;
import org.apache.logging.log4j.Logger;
import org.springframework.beans.factory.annotation.Autowired;
import org.springframework.scheduling.annotation.Scheduled;
import org.springframework.stereotype.Service;

import com.paulsofts.spirngbootscheduler.dao.MessageDao;
import com.paulsofts.spirngbootscheduler.data.Message;

@Service
public class MessageService {

	@Autowired
	private MessageDao messageDao;

	Logger logger = LogManager.getLogger(MessageService.class);

	/**
	 * Implementing fixedRate scheduling
	 * 1. Creating a message object.
	 * 2. Setting a random message to it.
	 * 3. Saving it to H2 database
	 * 4. This will happen at every 5 sec.
	 *
	 * @author paulsofts
	 * @Email feedback@paulsofts.com
	 */
	@Scheduled(fixedRate = 5000)
	public void addMessage() {
		Message msg = new Message();
		msg.setMsg("Welcome to paulsofts- " + new Random().nextInt(999));
		messageDao.save(msg);
		logger.info("Adding message in: " + new Date());
	}

	/**
	 * Implementing fixedRate scheduling
	 * 1. Fetching message from the H2-DB.
	 * 2. Using logs to verify the implementation
	 *
	 * @author paulsofts
	 * @Email feedback@paulsofts.com
	 */
	@Scheduled(cron = "0/15 * * * * *")
	public void getMessage() {
		List<Message> msg_list = messageDao.findAll();
		logger.info("Fetching message in: " + new Date());
		logger.info("Number of msg: " + msg_list.size());
		logger.info("Message: " + msg_list);
	}

}
Step 6- Enable Spring Boot scheduling using @EnableScheduling
In order to enable scheduling in the Spring Boot application, we need to annotate the Spring Boot main class using the @EnableScheduling annotation.
import org.springframework.boot.SpringApplication;
import org.springframework.boot.autoconfigure.SpringBootApplication;
import org.springframework.scheduling.annotation.EnableScheduling;
@SpringBootApplication
@EnableScheduling
public class SpirngBootSchedulerApplication {
public static void main(String[] args) {
SpringApplication.run(SpirngBootSchedulerApplication.class, args);
}
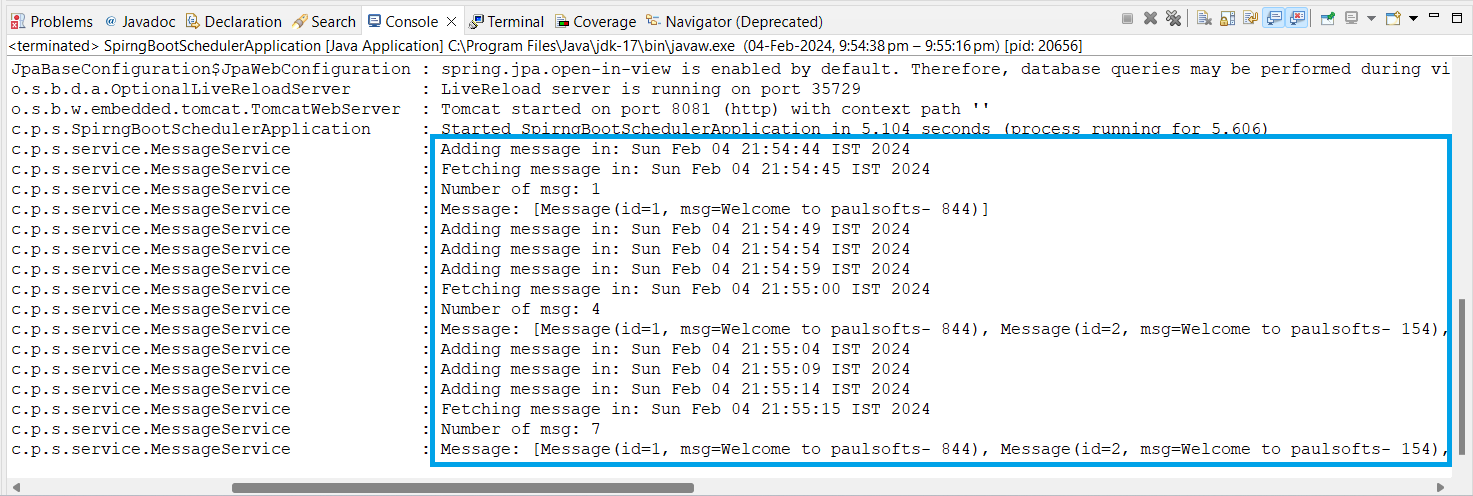
}Step 7- Testing
In order to test our Spring Boot Scheduler application. We need to run our application, and until and unless the application does not stop, it will add a message every 5 seconds and fetch it every 15 seconds.