YAML stands for YAML Ain’t Markup Language also know as Yet Another Markup Language, It is a popular configuration format used to define application properties and settings in a more human-readable manner. It is an alternative to the traditional properties file format (.properties), commonly used in Java applications. In this tutorial, we will learn to convert yaml to Java object. We can also convert the Java object to a YAML file. To learn more about this, please refer How to convert Java Object to YAML file?
Humans can easily understand, read and write YAML and machines can easily parse it. YAML uses indentation and colons to structure data, which makes it easier to understand and more compressed than XML or JSON.
In a Spring Boot application, we can use YAML to define various configuration settings, such as database connection properties, logging settings, profiles, and other application-specific properties. YAML files typically have a .yml extension.
Here’s an example of a simple Spring Boot application configuration in YAML format:
spring:
  datasource:
    url: jdbc:mysql://localhost:3306/paulsofts_db
    username: root
    password: root

logging:
  level:
    root: INFO
    com.paulsofts.mypackage: DEBUG

server:
port: 8080Note: Both properties files and YAML files serve the same purpose of configuring Spring Boot applications.
Java object from YAML file using Jackson Object Mapper
In this example, we are going to create a simple Spring Boot application, which converts the YAML file into Java objects using Object Mapper.
Steps to make Java object from YAML file
Step 1- Create Spring Boot application
To create a new project in Spring Boot, please refer to How to Create a Spring Boot Project Note that you must select Maven as the project type.
Step 2- Create a YAML file
We need to create a YAML file, which we consume to create the Java objects. In the context of the below YAML file, the dash (-) is used to define a list of employees, where each employee is represented as a map with their respective attributes such as id, name, age, position, and address.
employees:
  - id: 1
    name: Anjali Arora
    age: 30
    position: Software Engineer
    address:
      street: "123 Andheri West"
      city: "Mumbai"
      state: "Maharashtra"
      zipCode: 12345
  - id: 2
    name: Rahul Sharma
    age: 25
    position: SDET
    address:
      street: "456 Jama Masjid"
      city: "Delhi"
      state: "UP"
      zipCode: 67890
  - id: 3
    name: Ankur Pal
    age: 25
    position: Backend Developer
    address:
      street: "789 Mahmoorganj"
      city: "Varanasi"
      state: "UP"
      zipCode: 54321
Step 3- Create Model class
In order to convert the above YAML file into Java objects, we are required to create Employee and Address data model classes.
package com.paulsofts.yamlconversion.data;

import lombok.Getter;
import lombok.Setter;

/**
 * 1. Using Lombok library to
 * 	  generate getters and setters
 * @author paulsofts
 * */

@Getter
@Setter
public class Employee {

    private int id;
    private String name;
    private int age;
    private String position;
    private Address address;

}
Now, we create the Address data model, which we have used in the employee class.
package com.paulsofts.yamlconversion.data;

import lombok.Getter;
import lombok.Setter;

/**
 * 1. Using Lombok library to
 * 	  generate getters and setters
 * @author paulsofts
 * */

@Getter
@Setter
public class Address {

    private String street;
    private String city;
    private String state;
    private String zipCode;

}
Step 4- YAML Configuration
Create a YAML configuration class to load the employee data from the YAML file. We create the EmployeeConfig class with annotations that bind properties from the YAML file. It uses ObjectMapper to read the YAML file and convert it into a list of Employee objects, which is later used as a Spring Bean in the application. The configuration ensures that the employee data from the YAML file is available for other components or services in the Spring Boot application.
package com.paulsofts.yamlconversion.config;

import java.io.IOException;
import java.io.InputStream;
import java.util.List;
import org.springframework.beans.factory.annotation.Value;
import org.springframework.context.annotation.Bean;
import org.springframework.context.annotation.Configuration;
import com.fasterxml.jackson.databind.ObjectMapper;
import com.fasterxml.jackson.dataformat.yaml.YAMLFactory;
import com.paulsofts.yamlconversion.data.Employee;


@Configuration
public class EmployeeConfig {

	@Value("classpath:employees.yml")
	private InputStream inputStream;

	@Bean
    public List<Employee> getEmployees() throws IOException {
        ObjectMapper objectMapper = new ObjectMapper(new YAMLFactory());
        EmployeeWrapper employeeWrapper = objectMapper.readValue(inputStream, EmployeeWrapper.class);
        return employeeWrapper.getEmployees();
    }
}
Let us decode the above class one by one:
- @Configuration: This annotation marks the class as a configuration class, indicating that it will define Spring Beans.
- @Value: This annotation is used to inject values from the Spring Environment into fields in the class.
- “classpath:employees.yml”: This specifies the location of the YAML file, which is in the resources directory of the project. The classpath prefix is used to locate the file from the classpath.
- @Bean: This annotation marks the method as a Spring Bean. It indicates that this method will create a bean that should be configure and managed by the Spring container.
- ObjectMapper: It is one of the most important class of Jackson library which is used for converting Java objects to JSON called serialization and JSON to Java Object called deserialization.
- mapper.readValue(inputStream, EmployeeWrapper.class): The readValue method reads the YAML data from inputStream and deserialize it to EmployeeWrapper class.
Step 5- Create EmployeeWrapper class
The ObjectMapper.readValue method is used to deserialize the YAML data from the inputStream. Instead of directly deserializing into a List<Employee>, we use the EmployeeWrapper class, which acts as a wrapper for the list of employees.
package com.paulsofts.yamlconversion.config;

import java.util.List;
import com.paulsofts.yamlconversion.data.Employee;

import lombok.Getter;
import lombok.Setter;

/**
 * 1. Using Lombok library to
 * 	  generate getters and setters
 * @author paulsofts
 * */

@Getter
@Setter
public class EmployeeWrapper {

    private List<Employee> employees;

}
Step 6- Create Controller class
In this step, we create a Controller class, which is used to expose the Employee data.
package com.paulsofts.yamlconversion.controller;
import java.io.IOException;
import java.util.List;
import org.springframework.beans.factory.annotation.Autowired;
import org.springframework.web.bind.annotation.GetMapping;
import org.springframework.web.bind.annotation.RequestMapping;
import org.springframework.web.bind.annotation.RestController;
import com.paulsofts.yamlconversion.config.EmployeeConfig;
import com.paulsofts.yamlconversion.data.Employee;
@RestController
@RequestMapping("/employees")
public class EmployeeController {
@Autowired
private EmployeeConfig employeeConfig;
@GetMapping
public List<Employee> getAllEmployees() throws IOException {
System.out.println(employeeConfig.getEmployees());
return employeeConfig.getEmployees();
}
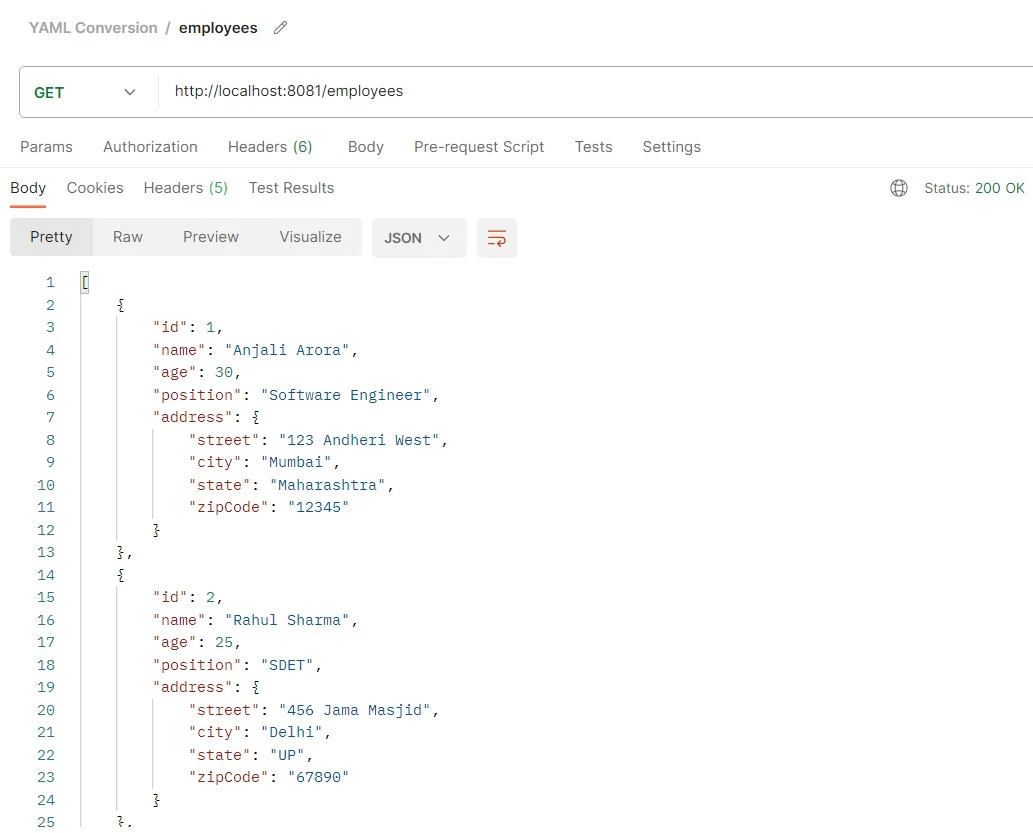
}Step 7- Test application
Now, we run and test our application with the help of the Postman API tool, and we can see we have converted Java YAML to object.