JAR stands for Java ARchive. The jar file represents a group of .class files. It is a file format that is based on the ZIP format. It is used to archive .class files, audio files, image files, and directories into a single jar file, which is further used to distribute the application or libraries over multiple Java platforms. In this tutorial, we will learn how to package Spring Boot application to JAR file and run it.
Package Spring Boot application to JAR
Step 1- Create Spring Boot Application
To create a new project in Spring Boot, please refer to How to Create a Spring Boot Project Note that you must select Maven as the project type.
Step 2- Create Services
In this step, for demo purposes, we will create a simple service that returns a string message whenever called with the help of an endpoint. We create a controller class, name it Controller, and add the below API to it. Make sure that you follow your own package structure.
package com.paulsofts.javaarchive.controller;

import org.springframework.web.bind.annotation.GetMapping;
import org.springframework.web.bind.annotation.RequestMapping;
import org.springframework.web.bind.annotation.RestController;

@RestController
@RequestMapping("/api")
public class Controller {

	@GetMapping("/welcome")
	public String welcome() {
		return "Welcome to Java Archive!";
	}
}
We are going to set the port for our application as 8081. For this, go to application.properties file and add server.port=8081.
Step 3- pom.xml file configuration
By default, the Spring Boot application comes in jar packaging. We can explicitly add the packaging type with the help of the <packaging> attribute. We need to add the following attributes to our pom.xml file.
<project ...>
    ...
    <packaging>jar</packaging>
    ...
</project>
In order to create executable jars, we need to add spring-boot-maven-plugin to our pom.xml file, just below the dependencies section.
<build>
    <plugins>
        <plugin>
            <groupId>org.springframework.boot</groupId>
            <artifactId>spring-boot-maven-plugin</artifactId>
        </plugin>
    </plugins>
</build>
Please see the complete pom.xml file for reference.
<?xml version="1.0" encoding="UTF-8"?>
<project xmlns="http://maven.apache.org/POM/4.0.0" xmlns:xsi="http://www.w3.org/2001/XMLSchema-instance"
	xsi:schemaLocation="http://maven.apache.org/POM/4.0.0 https://maven.apache.org/xsd/maven-4.0.0.xsd">
	<modelVersion>4.0.0</modelVersion>
	<parent>
		<groupId>org.springframework.boot</groupId>
		<artifactId>spring-boot-starter-parent</artifactId>
		<version>3.1.0</version>
		<relativePath/>
	</parent>
	<groupId>com.paulsofts</groupId>
	<artifactId>java-archive</artifactId> <!-- The JAR name will be in following format: <artifactId>-<version> -->
	<version>0.0.1-SNAPSHOT</version>
	<packaging>jar</packaging> <!-- adding packagin type as jar-->
	<name>java-archive</name>
	<description>Demo project for Spring Boot</description>
	<properties>
		<java.version>17</java.version>
	</properties>
	<dependencies>
		<dependency>
			<groupId>org.springframework.boot</groupId>
			<artifactId>spring-boot-starter-web</artifactId>
		</dependency>

		<dependency>
			<groupId>org.springframework.boot</groupId>
			<artifactId>spring-boot-starter-test</artifactId>
			<scope>test</scope>
		</dependency>
	</dependencies>
	<!-- spring-boot-maven-plugin is requried for generating executable jars-->
	<build>
		<plugins>
			<plugin>
				<groupId>org.springframework.boot</groupId>
				<artifactId>spring-boot-maven-plugin</artifactId>
			</plugin>
		</plugins>
	</build>
</project>
Step 4- Convert Spring Boot application to executable JAR file
To create an executable jar, we need to do a Maven build for our Spring Boot application. Once our maven build is finished, the jar gets created in our target directory. Currently, we can see that our target directory is empty.
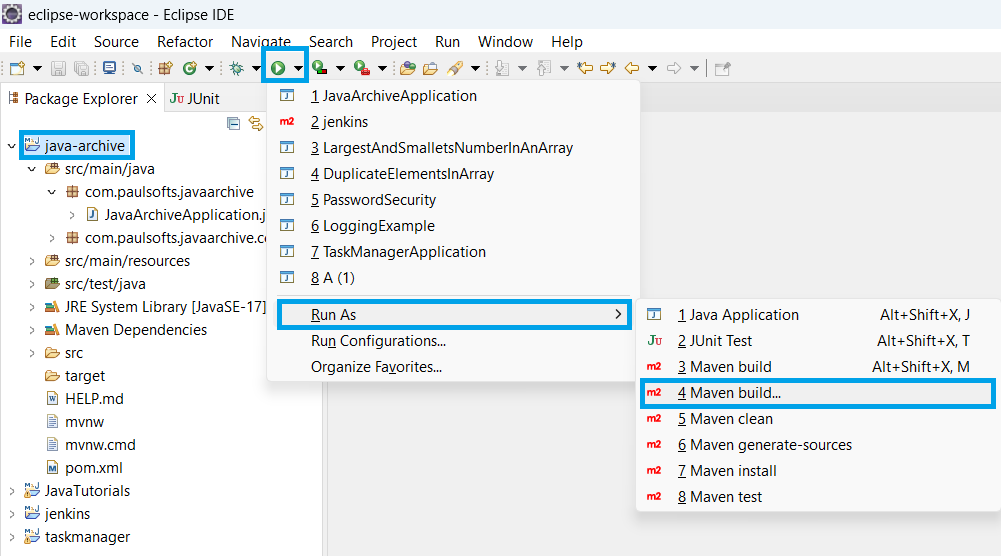
For Maven Build, we need to Select Project > Run > Run As > Maven build.

As we click on Maven build, it will open a pop-up window asking about the Goals of our build process. We need to add package there and click on Run.
After the build is finished, we can see the console logs for jar details.

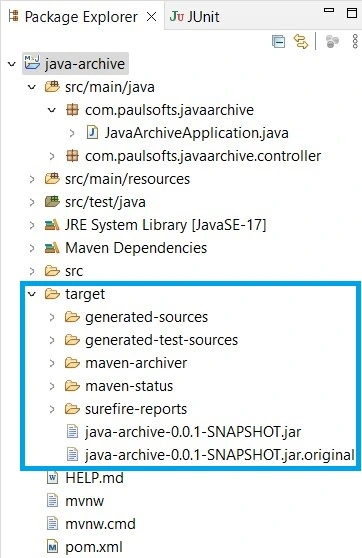
We can also check that jars are created in our target directory.
Step 5- Run JAR File
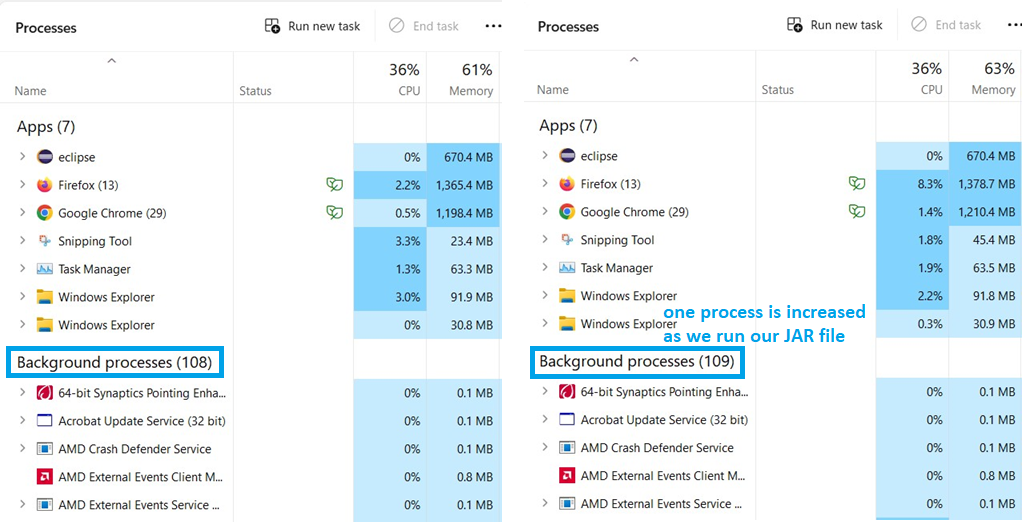
To run our application with an executable jar. We need to go to the directory location where our jar is added and just double-click the jar. As soon as we double-click the jar and run it, we can see one process increased in our task manager’s process details.

We can check if our application’s jar is running with the help of the command prompt. We need to open our CMD and run the following command: jps. We can see our executable jar file is running.
Output
Now we can test our application. As our JAR file is running, we can hit the endpoint in browser or postman to get the desired output.
To stop our running jar file. We need to run the following command in CMD: taskkill -f /PID Our-JAR-Process-Id.


