In Enterprise applications, we may be required to have multiple databases for storing different kinds of information. For example, in an e-commerce application, it may be required to keep the user’s information in a different database, product-related information in a different database, and payment-related information in a separate database. In this tutorial, we will configure multiple database in Spring Boot application.
The multi-model database has the following benefits:
- Improve reliability
- Easy to handle different forms of data
- Simplify data and database management
- Easy to scale
- Improve fault tolerance
- Data consistency
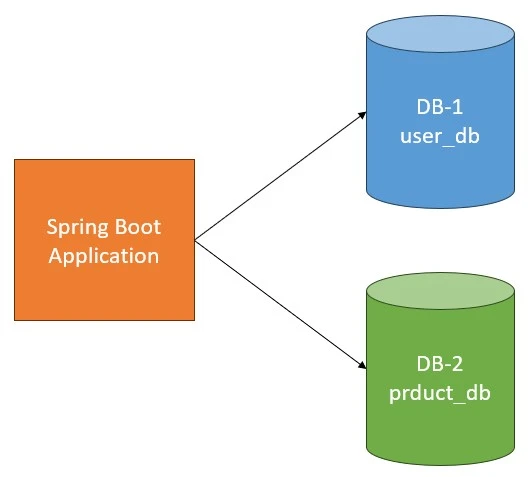
In this example, we are going to create a Spring Boot application and add two different databases to it. One for storing user-related information and one for product information.
Steps to configure multiple database in Spring Boot
Step 1- Create Databases
First, we need to create databases to store user and product-related information. We use MySQL and create two databases. To learn how to create a database in MySQL, please refer How to make database schema in MySQL Workbench?
Step 2- Create Spring Boot project
To create a new project in Spring Boot, please refer to How to Create a Spring Boot Project Note that you must select Maven as the project type.
Step 3- Adding Database configurations
After we have created our spring boot project, we need to add database configurations for connecting our application to the database. We will be adding the following database configuration in our application.properties file.
#server configuration
server.port=8081

#we need to keep the prefix for data source different
#so, when we fetch the configurations this will helps
#to determine which database is getting called

#first database configurations
first.datasource.url=jdbc:mysql://localhost:3306/user_db
first.datasource.username=root
first.datasource.password=root
first.datasource.driver-class-name=com.mysql.cj.jdbc.Driver

#second database configurations
second.datasource.url=jdbc:mysql://localhost:3306/product_db
second.datasource.username=root
second.datasource.password=root
second.datasource.driver-class-name=com.mysql.cj.jdbc.Driver

#similarly, we can add more DBs configurationsNote: We use spring.datasource.url to connect to our database. Here, as we have multiple databases, we need to read each configuration in our Java code. So, to make it easy to understand and differentiate between two different databases, we have used the prefixes first and second.
Step 4- Create Package structure
Before moving further, we need to create the following package structure for two different entities: i.e., user and product, and for both entities we are going to create three different folder structures: config, data, and repository.

Step 5- Create Entities classes
In this step, we will create User.java and Product.java in the corresponding packages. i.e., com.paulsofts.multipledbservices.product.data and com.paulsofts.multipledbservices.user.data as entity classes and add the following codes to them:
User.java
package com.paulsofts.multipledbservices.user.data;

import jakarta.persistence.Entity;
import jakarta.persistence.GeneratedValue;
import jakarta.persistence.GenerationType;
import jakarta.persistence.Id;
import jakarta.persistence.Table;
import lombok.AllArgsConstructor;
import lombok.Builder;
import lombok.Getter;
import lombok.NoArgsConstructor;
import lombok.Setter;

@Getter
@Setter
@NoArgsConstructor
@AllArgsConstructor
@Builder
@Entity
@Table(name = "user_information")
public class User {

	@Id
	@GeneratedValue(strategy = GenerationType.AUTO)
	private int user_id;
	private String user_name;

}
Product.java
package com.paulsofts.multipledbservices.product.data;

import jakarta.persistence.Entity;
import jakarta.persistence.GeneratedValue;
import jakarta.persistence.GenerationType;
import jakarta.persistence.Id;
import jakarta.persistence.Table;
import lombok.AllArgsConstructor;
import lombok.Builder;
import lombok.Getter;
import lombok.NoArgsConstructor;
import lombok.Setter;

@Getter
@Setter
@NoArgsConstructor
@AllArgsConstructor
@Builder
@Entity
@Table(name = "product_information")
public class Product {

	@Id
	@GeneratedValue(strategy = GenerationType.AUTO)
	private int prd_id;
	private String prd_name;
	private double prd_price;
}
Step 6- Create Repositories interface
Now, we are required to create repository interfaces for our User and Product classes. For this, we go to the corresponding user.repository and product.repository packages and create two interfaces, UserRepository and ProductRepository, and extend them to JpaRepository<T, ID>.
UserRepository.java
package com.paulsofts.multipledbservices.user.repository;

import org.springframework.data.jpa.repository.JpaRepository;

import com.paulsofts.multipledbservices.user.data.User;

public interface UserRepository extends JpaRepository<User, Integer>{

}
ProductRepository.java
package com.paulsofts.multipledbservices.product.repository;

import org.springframework.data.jpa.repository.JpaRepository;

import com.paulsofts.multipledbservices.product.data.Product;

public interface ProductRepository extends JpaRepository<Product, Integer> {

}
Step 7- Create Database config classes
After we are done with our entity and repository classes, we need to create a configuration class for our database. For this, we go to the corresponding user.config and product.config packages and create two classes, UserDbConfig.java and ProductDbConfig.java. We annotate these classes with @Configuration, @EnableTransactionManagement and @EnableJpaRepositories.
What is @Configuration annotation in Spring Boot?
The @Configuration annotation is part of the Spring framework. It is a class-level annotation that indicates that the class has @Bean definition methods and it allows the Spring container to process the class and generate spring beans to be used in the application.
What is @EnableJpaRepositories annotation in Spring Boot?
The @EnableJpaRepositories annotation is used to create the repository classes from the Spring Data JPA interface.
What is @EnableTransactionManagement annotation in Spring Boot?
It is used to allow application for transaction management by configuring either classical, imperative or reactive transaction management.
UserDbConfig.java
package com.paulsofts.multipledbservices.user.config;

import java.util.HashMap;
import java.util.Map;

import javax.sql.DataSource;

import org.springframework.beans.factory.annotation.Autowired;
import org.springframework.context.annotation.Bean;
import org.springframework.context.annotation.Configuration;
import org.springframework.context.annotation.Primary;
import org.springframework.core.env.Environment;
import org.springframework.data.jpa.repository.config.EnableJpaRepositories;
import org.springframework.jdbc.datasource.DriverManagerDataSource;
import org.springframework.orm.jpa.JpaTransactionManager;
import org.springframework.orm.jpa.JpaVendorAdapter;
import org.springframework.orm.jpa.LocalContainerEntityManagerFactoryBean;
import org.springframework.orm.jpa.vendor.HibernateJpaVendorAdapter;
import org.springframework.transaction.PlatformTransactionManager;
import org.springframework.transaction.annotation.EnableTransactionManagement;


@Configuration
@EnableTransactionManagement
@EnableJpaRepositories(

		entityManagerFactoryRef = "firstDbEntityManagerFactoryBean",
		basePackages = {"com.paulsofts.multipledbservices.user.repository"},
		transactionManagerRef = "firstDbPlatformTransactionManager"

		)
public class UserDbConfig {

	//this is used for reading configuration from properties file
	@Autowired
	private Environment environment;

	//DataSource bean
	@Bean(name = "firstDataSource")
	@Primary
	public DataSource dataSource() {
		//we will fetch and set database configurations from application.properties file
		DriverManagerDataSource driverManagerDataSource = new DriverManagerDataSource();
		driverManagerDataSource.setUrl(environment.getProperty("first.datasource.url"));
		driverManagerDataSource.setUsername(environment.getProperty("first.datasource.username"));
		driverManagerDataSource.setPassword(environment.getProperty("first.datasource.password"));
		driverManagerDataSource.setDriverClassName(environment.getProperty("first.datasource.driver-class-name"));

		return driverManagerDataSource;
	}

	//EntityManager bean
	@Bean(name = "firstDbEntityManagerFactoryBean")
	public LocalContainerEntityManagerFactoryBean entityManagerFactoryBean() {
		LocalContainerEntityManagerFactoryBean bean = new LocalContainerEntityManagerFactoryBean();

		//setting data source
		bean.setDataSource(dataSource());

		//setting JPA adapter
		JpaVendorAdapter jpaVendorAdapter = new HibernateJpaVendorAdapter();
		bean.setJpaVendorAdapter(jpaVendorAdapter);

		//setting hibernate properties
		Map<String, String> hibernate_properties = new HashMap<String, String>();
		hibernate_properties.put("hibernate.dialect", "org.hibernate.dialect.MySQLDialect");
		hibernate_properties.put("hibernate.show_sql", "true");
		hibernate_properties.put("hibernate.hbm2ddl.auto", "create");

		bean.setJpaPropertyMap(hibernate_properties);

		//setting entities(model class) package path
		bean.setPackagesToScan("com.paulsofts.multipledbservices.user.data");
		return bean;
	}

	//TransactionManager bean
	@Bean(name = "firstDbPlatformTransactionManager")
	@Primary
	public PlatformTransactionManager platformTransactionManagerBean() {
		JpaTransactionManager jpaTransactionManager = new JpaTransactionManager();
		jpaTransactionManager.setEntityManagerFactory(entityManagerFactoryBean().getObject());
		return jpaTransactionManager;
	}

}
ProductDbConfig.java
package com.paulsofts.multipledbservices.product.config;

import java.util.HashMap;
import java.util.Map;

import javax.sql.DataSource;

import org.springframework.beans.factory.annotation.Autowired;
import org.springframework.context.annotation.Bean;
import org.springframework.context.annotation.Configuration;
import org.springframework.context.annotation.Primary;
import org.springframework.core.env.Environment;
import org.springframework.data.jpa.repository.config.EnableJpaRepositories;
import org.springframework.jdbc.datasource.DriverManagerDataSource;
import org.springframework.orm.jpa.JpaTransactionManager;
import org.springframework.orm.jpa.JpaVendorAdapter;
import org.springframework.orm.jpa.LocalContainerEntityManagerFactoryBean;
import org.springframework.orm.jpa.vendor.HibernateJpaVendorAdapter;
import org.springframework.transaction.PlatformTransactionManager;
import org.springframework.transaction.annotation.EnableTransactionManagement;

@Configuration
@EnableTransactionManagement
@EnableJpaRepositories(

		entityManagerFactoryRef = "secondDbEntityManagerFactoryBean",
		basePackages = {"com.paulsofts.multipledbservices.product.repository"},
		transactionManagerRef = "secondDbPlatformTransactionManager"

		)
public class ProductDbConfig {

	//this is used for reading configuration from properties file
		@Autowired
		private Environment environment;

		//DataSource bean
		@Bean(name = "secondDataSource")
		@Primary
		public DataSource dataSource() {
			//we will fetch and set database configurations from application.properties file
			DriverManagerDataSource driverManagerDataSource = new DriverManagerDataSource();
			driverManagerDataSource.setUrl(environment.getProperty("second.datasource.url"));
			driverManagerDataSource.setUsername(environment.getProperty("second.datasource.username"));
			driverManagerDataSource.setPassword(environment.getProperty("second.datasource.password"));
			driverManagerDataSource.setDriverClassName(environment.getProperty("second.datasource.driver-class-name"));

			return driverManagerDataSource;
		}

		//EntityManager bean
		@Bean(name = "secondDbEntityManagerFactoryBean")
		public LocalContainerEntityManagerFactoryBean entityManagerFactoryBean() {
			LocalContainerEntityManagerFactoryBean bean = new LocalContainerEntityManagerFactoryBean();

			//setting data source
			bean.setDataSource(dataSource());

			//setting JPA adapter
			JpaVendorAdapter jpaVendorAdapter = new HibernateJpaVendorAdapter();
			bean.setJpaVendorAdapter(jpaVendorAdapter);

			//setting hibernate properties
			Map<String, String> hibernate_properties = new HashMap<String, String>();
			hibernate_properties.put("hibernate.dialect", "org.hibernate.dialect.MySQLDialect");
			hibernate_properties.put("hibernate.show_sql", "true");
			hibernate_properties.put("hibernate.hbm2ddl.auto", "create");

			bean.setJpaPropertyMap(hibernate_properties);

			//setting entities(model class) package path
			bean.setPackagesToScan("com.paulsofts.multipledbservices.product.data");
			return bean;
		}

		//TransactionManager bean
		@Bean(name = "secondDbPlatformTransactionManager")
		@Primary
		public PlatformTransactionManager platformTransactionManagerBean() {
			JpaTransactionManager jpaTransactionManager = new JpaTransactionManager();
			jpaTransactionManager.setEntityManagerFactory(entityManagerFactoryBean().getObject());
			return jpaTransactionManager;
		}

}
Step 8- Test application
Now, we will test our application.
Run application:
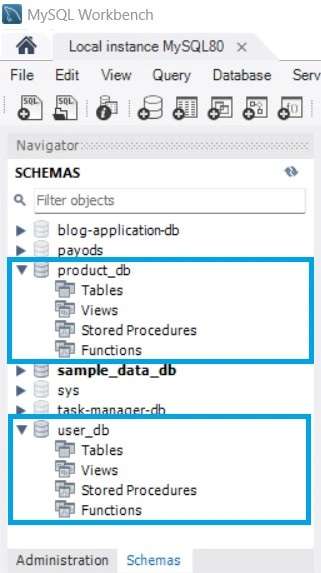
As we have used hibernate for the field mapping, as soon as we run our application, it must create two tables, user_information and product_information, in two different tables. i.e., user_db and product_db.
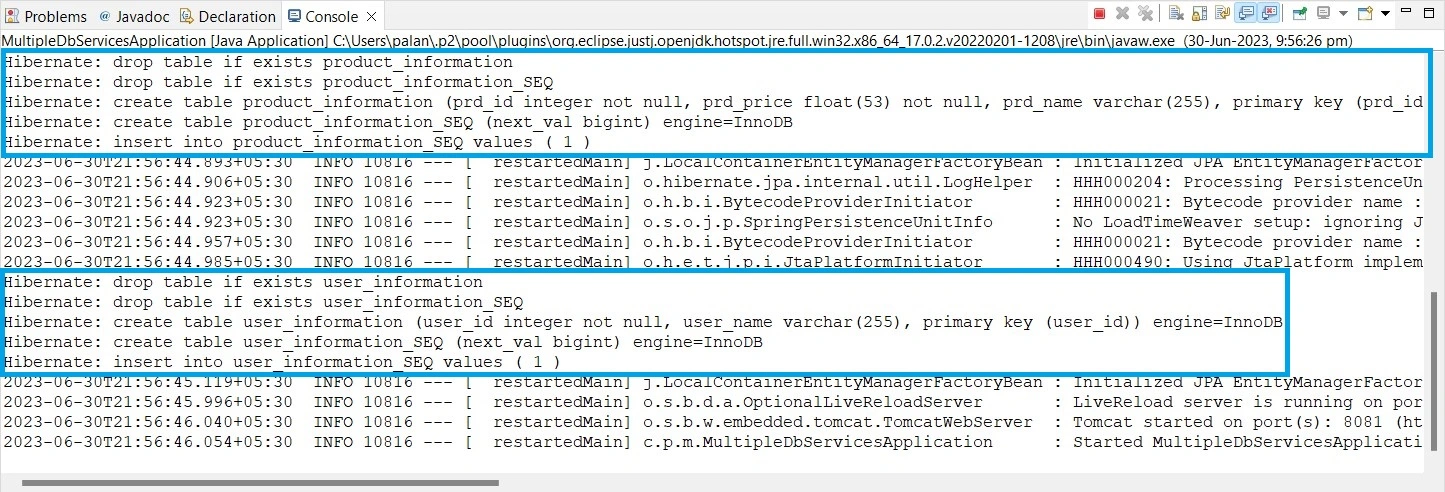
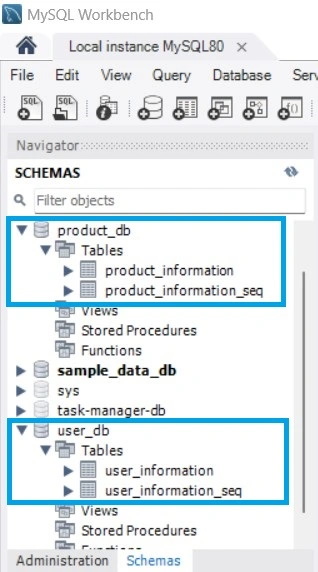
We can also check the MySQL database; two tables have been created in the database.
Test Case:
We also write the test case for our application to insert data into the two different tables.
MultipleDbServicesApplicationTests.java
package com.paulsofts.multipledbservices;
import org.junit.jupiter.api.Test;
import org.springframework.beans.factory.annotation.Autowired;
import org.springframework.boot.test.context.SpringBootTest;
import com.paulsofts.multipledbservices.product.data.Product;
import com.paulsofts.multipledbservices.product.repository.ProductRepository;
import com.paulsofts.multipledbservices.user.data.User;
import com.paulsofts.multipledbservices.user.repository.UserRepository;
@SpringBootTest
class MultipleDbServicesApplicationTests {
@Autowired
private UserRepository userRepository;
@Autowired
private ProductRepository productRepository;
@Test
void dbTest() {
//creating user
User user = User.builder()
.user_name("paulsofts")
.build();
//creating product
Product product = Product.builder()
.prd_name("HP Envy x 360")
.prd_price(94460.0)
.build();
//inserting into user_db
userRepository.save(user);
//inserting into product_db
productRepository.save(product);
}
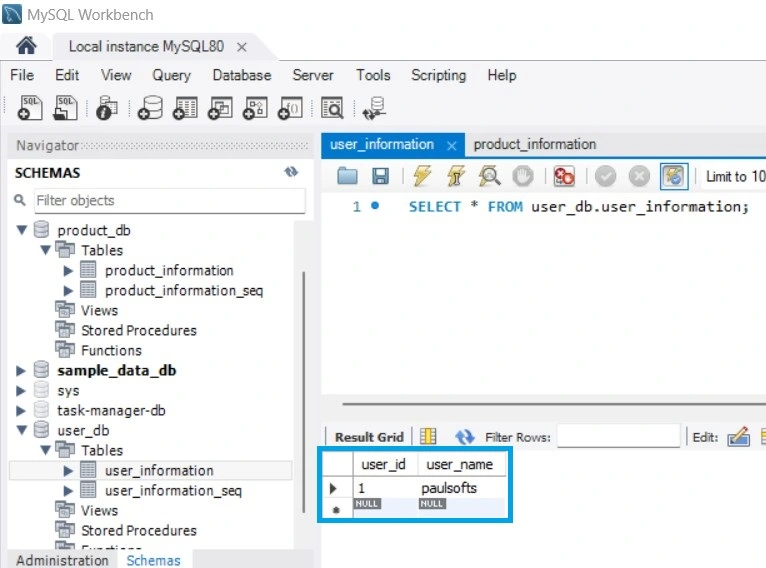
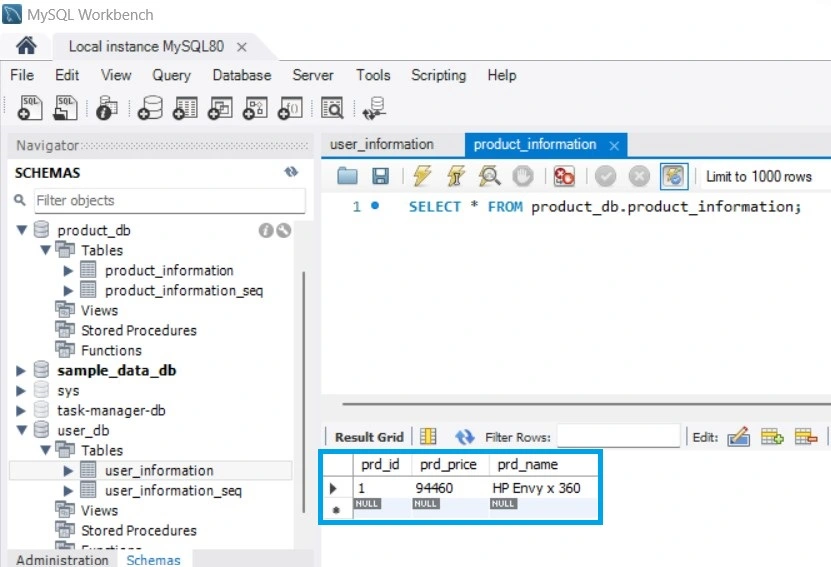
}As we can see, our test case is executed successfully, and the data is inserted into the database tables.
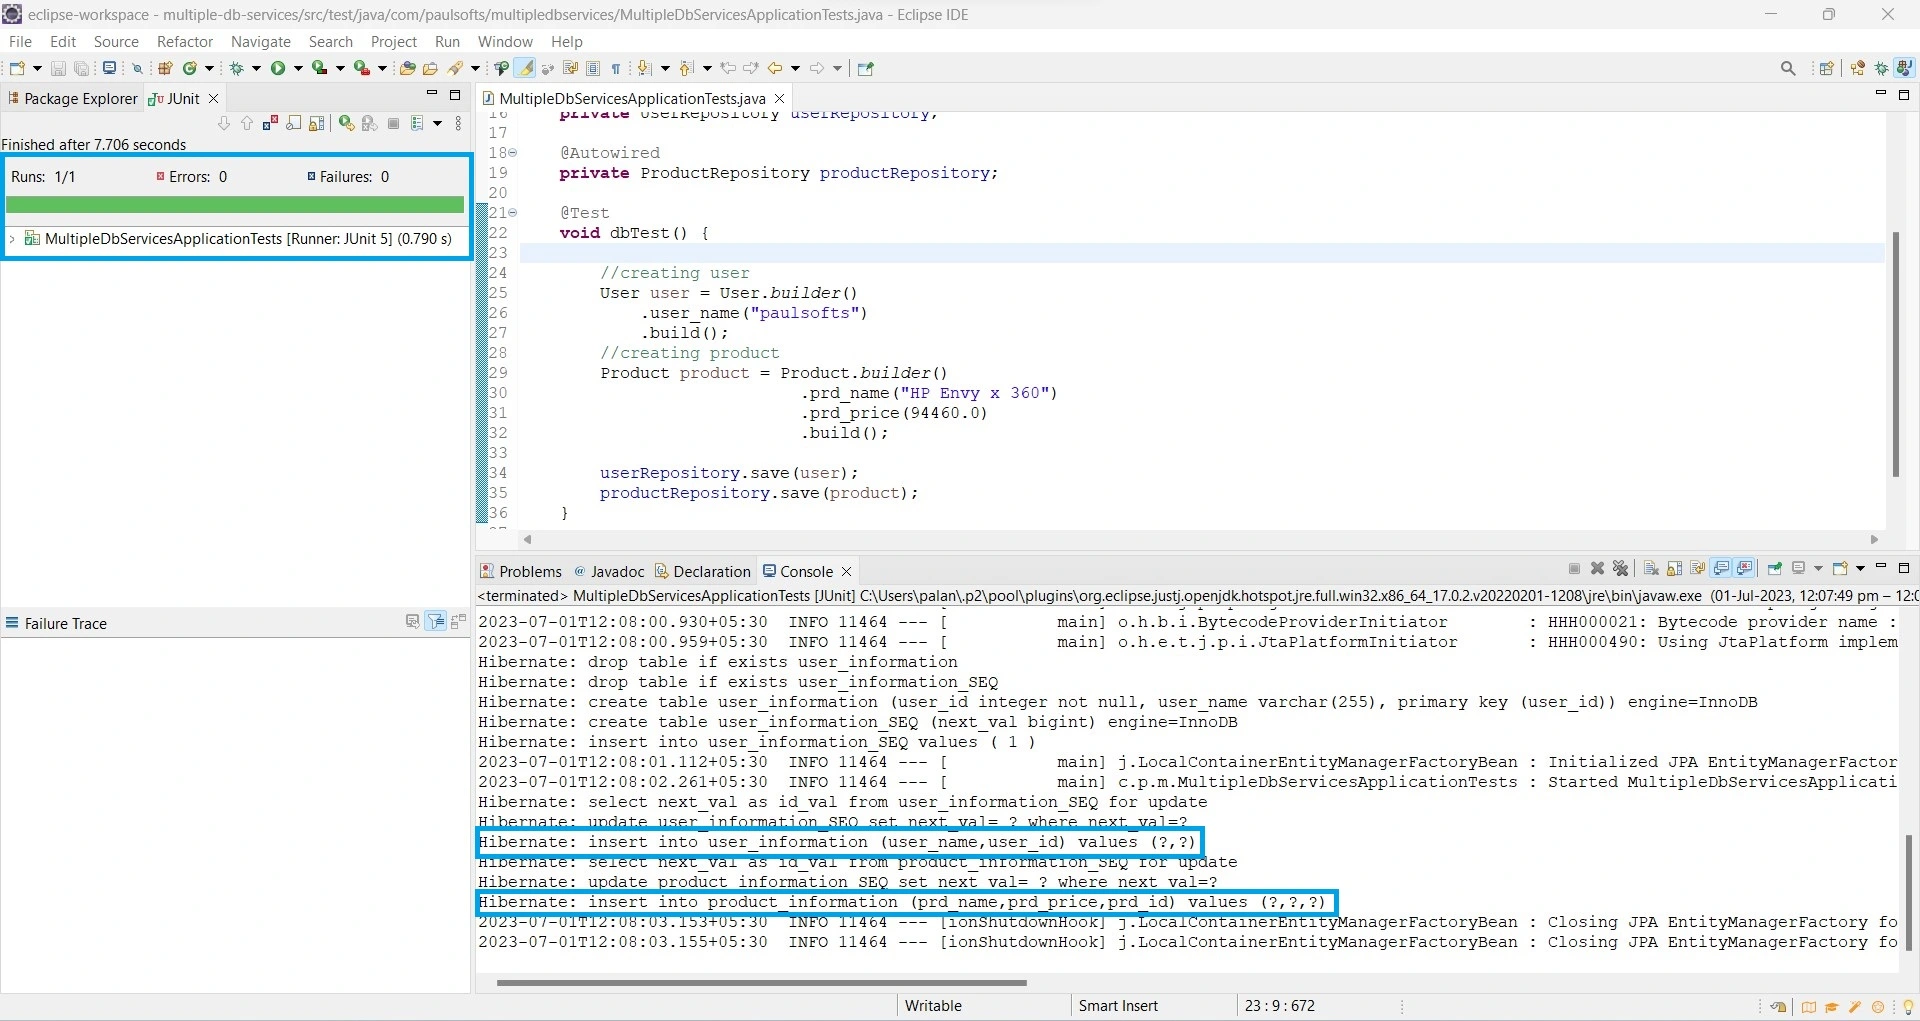
We can also check the database to see whether the data has been inserted into the tables.