

In Java, annotation is a form of metadata that provides information about the programs but it is not the part of the program itself. The annotations are used by compilers, development tools or runtime libraries for different purposes. We can write annotations with the help of the @ symbol followed by the annotation name. In this tutorial, we will create a custom annotation in Java.
Steps to create custom annotation in Java
Step 1- Create a new Java project or package
We will create a new Java project or in any existing project we will create a new package as shown in the below picture.

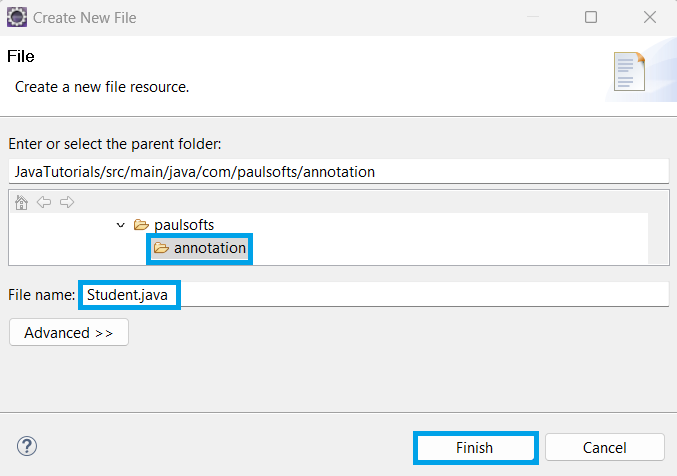
Step 2- Create a Java file
In this step, we will create a new file and name it as the annotation name we want. For this example, we are using Student as the name of our custom annotation. So, we will create a new file as Student.java.
Step 3- Rules to create custom annotations
In order to create custom annotations, first we need to add package declaration to the Student.java file we have created above. We are required to use @interface followed by the annotation name we want to create a custom annotation.
package com.paulsofts.annotation;

/**
 * 1. Add package declaration
 * 2. use @interface annotation to create custom annotation
 *
 * @author paulsofts
 */

@interface Student{

}
Rules to create custom annotations
- Parameters should not be passed to the methods of annotation.
- Annotation methods can have a return type as primitive, String, Enum or array of these.
- We have assign default values to the method of Java annotations.
- We can attach other annotations to a custom annotation called meta annotation which specifies information about the annotation.
Step 4- Create custom annotation in Java
Using the above rules, we have added methods to our @Student annotation which will return ID and the name of the student respectively.
package com.paulsofts.annotation;

/**
 * 1. Add package declaration
 * 2. use @interface annotation to create custom annotation
 * 3. adding method to annotation with default values
 * 4. make sure to follow all the rules to create custom annotation
 *
 * @author paulsofts
 */

@interface Student{

	int studentId() default -1;
	String studentName() default "";
}
As we have multiple values in @Student annotation, ID and name. So, this type of annotation is called multi-valued annotation. Similarly, if we pass single value it is called as single-valued annotation and if we do not pass any value it is called as marker annotation.
Step 5- Meta annotation
We can create custom annotations with the help of meta annotations. We are going to use the following two meta annotation to create our custom @Student annotation.
- @Target This meta annotation indicates where we can add our annotation. In other words, it specifies the Java element to which the annotation can be applied. Some of the possible values where we can add meta annotations are TYPE, FIELD, METHODS, CONSTRUCTORS, PACKAGE, LOCAL_VARIABLE etc.
- @Retention It determines how long an annotation should be retained and whether the annotation is available at runtime or compile-time.
import java.lang.annotation.ElementType;
import java.lang.annotation.Retention;
import java.lang.annotation.RetentionPolicy;
import java.lang.annotation.Target;

/**
 * 1. Add package declaration
 * 2. Use @interface annotation to create custom annotation
 * 3. Adding method to annotation with default values
 * 4. Make sure to follow rules to create custom annotation
 * 5. @Target(ElementType.FIELD)- specifies that it can be used over classes, interfaces and enums.
 * 6. @Retention(RetentionPolicy.RUNTIME)- specifies that the annotation would be available at runtime.
 *
 * @author paulsofts
 */

@Target(ElementType.FIELD)
@Retention(RetentionPolicy.RUNTIME)
@interface Student{

	int studentId() default -1;
	String studentName() default "";
}
Step 6- Create Test class
We create a class called Test and annotate this class with our custom @Student annotation.
/**
 * 1. Annotate Test class with our custom annotation @Student
 * 2. We have specified the studentId and studentName, if we do
 *    not specify it, it will add default value to it.
 *
 * @author paulsofts
 */
@Student(studentId = 35, studentName = "Ankur")
public class Test {

}
Step 7- How to use custom annotation
We can use Reflection API to process the annotation at runtime.
/**
 * 1. We need to use ReflectionAPI to process the annotations
 * 2. Using test object, we can get its class
 * 3. Using class of test object we can get its annotation,
 *    with the help of which we can access its values.
 *
 * @author paulsofts
 */
public class Main {

	public static void main(String[] args) {

		Test test = new Test();
		Class<?> classType =  test.getClass();

		System.out.println(classType.getName());

		Student student = (Student)classType.getAnnotation(Student.class);

		System.out.println(student.studentId() + " : " + student.studentName());
	}
}
Output:
