What is Redis?
Redis stands for Remote Dictionary Server. It is an open-source, in-memory data structure store that can be used as a database, cache, and message broker. It is designed for high performance, scalability, and ease of use. Redis is often referred to as a key-value store.
In this tutorial, we develop a Spring Boot application that will use the Redis Database and perform CRUD Operation.
Step to implement Spring Boot Redis example
Step 1- Download Redis
In order to use the Redis database, we need to download and install Redis. Till January 2022, Redis does not have official support for Windows OS. It is primarily developed and optimized for Unix-like operating systems, such as Linux. For this tutorial, we will be using Redis version 3.2. It’s a bit older, but it is easily available to setup.
Step 2- Run Redis Server
After we have downloaded the Redis server, we need to extract it and simply run the redis-server application. It will start the Redis server on Port 6379.
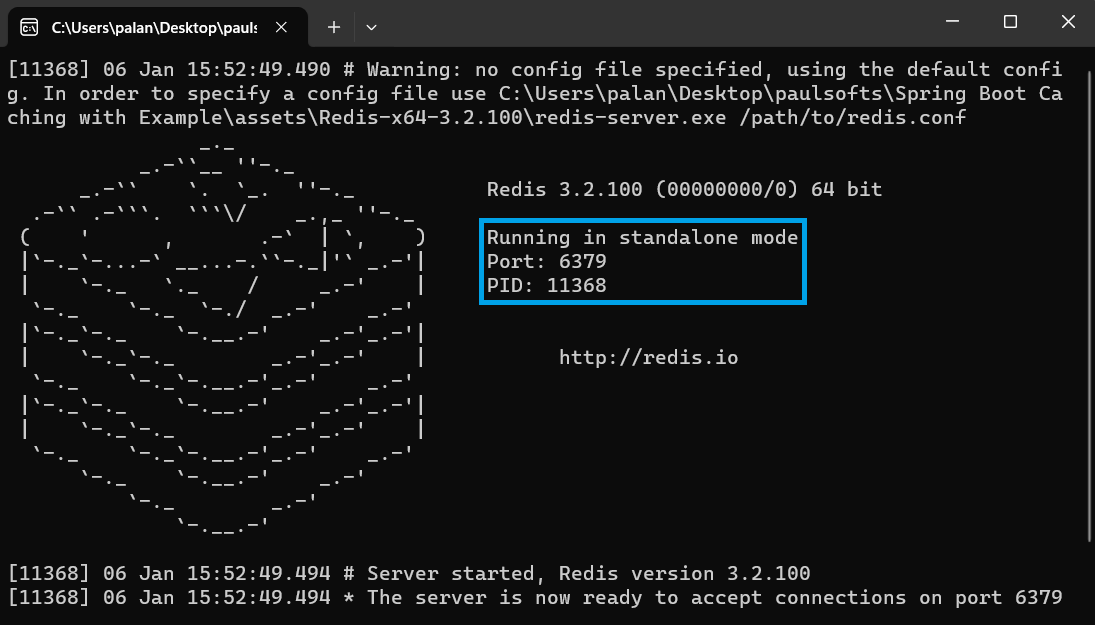
Now, we will create a Spring Boot application that will interact with our Redis server.
Step 3- Create Spring Boot project
We will create a Spring Boot application for product services. To learn how to create a Spring Boot project, please refer to How to Create a Spring Boot Project?. Make sure to add the Spring Data Redis (Access + Driver) dependency.
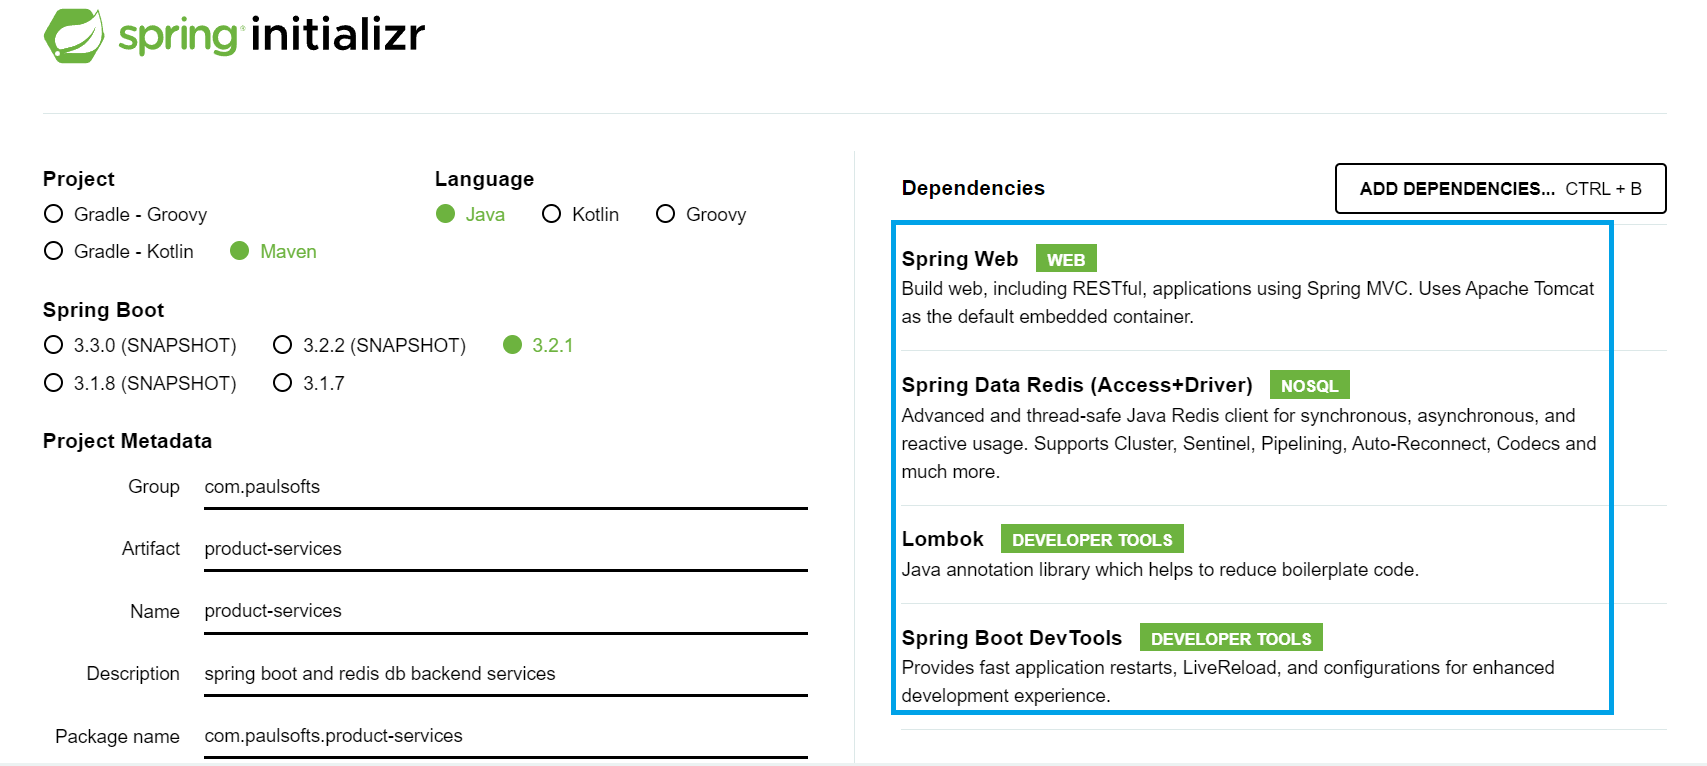
Step 4- Spring Boot Redis Dependency
We have used the following dependency in our product-services:
<dependencies>
		<dependency>
			<groupId>org.springframework.boot</groupId>
			<artifactId>spring-boot-starter-data-redis</artifactId>
		</dependency>
		<dependency>
			<groupId>org.springframework.boot</groupId>
			<artifactId>spring-boot-starter-web</artifactId>
		</dependency>
		<!-- https://mvnrepository.com/artifact/redis.clients/jedis -->
		<dependency>
			<groupId>redis.clients</groupId>
			<artifactId>jedis</artifactId>
			<version>5.1.0</version>
		</dependency>
		<dependency>
			<groupId>org.springframework.boot</groupId>
			<artifactId>spring-boot-devtools</artifactId>
			<scope>runtime</scope>
			<optional>true</optional>
		</dependency>
		<dependency>
			<groupId>org.projectlombok</groupId>
			<artifactId>lombok</artifactId>
			<optional>true</optional>
		</dependency>
		<dependency>
			<groupId>org.springframework.boot</groupId>
			<artifactId>spring-boot-starter-test</artifactId>
			<scope>test</scope>
		</dependency>
	</dependencies>
Step 5- Create an entity class
We will create an entity class for the product with id, name, quantity, and price as fields. We have also annotated our entity class with the @RedisHash annotation.
import org.springframework.data.annotation.Id;
import org.springframework.data.redis.core.RedisHash;

import lombok.Data;

/**
 * 1. Product entity class
 * 2. @RedisHash indicates that the entity class should
 *    be stored as a hash in Redis
 *
 * @author paulsofts
 */

@Data
@RedisHash("Product")
public class Product {

	@Id
	protected int pdtId;
	protected String pdtName;
	protected int pdtQuantity;
	protected double pdtPrice;

}
What is @RedisHash?
The @RedisHash annotation over an entity class indicates that this entity class should be stored in Redis as a hash. Hashes in Redis are maps between string fields and string values; they are useful for representing objects.
Step 6- Create Spring Boot Redis configuration class
We need configuration to connect our application to the Redis server. In order to do this, we use the Jedis dependency and will add it to the pom.xml file.
<!-- https://mvnrepository.com/artifact/redis.clients/jedis -->
<dependency>
    <groupId>redis.clients</groupId>
    <artifactId>jedis</artifactId>
    <version>5.1.0</version>
</dependency>
In the configuration class, we need to define the JedisConnectionFactory that is used to connect our application to the Redis server. After the connection has been established successfully, we need our application to have access to the Redis server, which can be done with RedisTemplate<String, Object>. It specifies that the datatype that is used to store keys in Redis is of the string type, and the datatype that is used to store values in Redis is of the object type.
import org.springframework.context.annotation.Bean;
import org.springframework.context.annotation.Configuration;
import org.springframework.data.redis.connection.RedisStandaloneConfiguration;
import org.springframework.data.redis.connection.jedis.JedisConnectionFactory;
import org.springframework.data.redis.core.RedisTemplate;
import org.springframework.data.redis.repository.configuration.EnableRedisRepositories;
import org.springframework.data.redis.serializer.JdkSerializationRedisSerializer;
import org.springframework.data.redis.serializer.StringRedisSerializer;

/**
 * 1. JedisConnectionFactory is used to define the connection
 *    to connect application to Redis server
 *
 * 2. We have define the host as localhost and set the port on which
 *    our Redis server is running
 *
 * 3. To access Redis server from application we need RedisTemplate
 *
 * @author paulsofts
 */

@Configuration
@EnableRedisRepositories
public class RedisConfig {

	@Bean
	public JedisConnectionFactory jedisConnectionFactory() {
		RedisStandaloneConfiguration configuration = new RedisStandaloneConfiguration();
		configuration.setHostName("localhost");
		configuration.setPort(6379);
		return new JedisConnectionFactory(configuration);
	}

	public RedisTemplate<String, Object> redisTemplate(){
		RedisTemplate<String, Object> template = new RedisTemplate<String, Object>();
		template.setConnectionFactory(jedisConnectionFactory());
		template.setKeySerializer(new StringRedisSerializer());
		template.setHashKeySerializer(new StringRedisSerializer());
		template.setHashKeySerializer(new JdkSerializationRedisSerializer());
		template.setValueSerializer(new JdkSerializationRedisSerializer());
		template.setEnableTransactionSupport(true);
		template.afterPropertiesSet();
		return template;
	}

}
Step 7- Dao layer: Spring Boot Redis Template
We create a dao layer for our product-services application where we have autowired the RedisTemplate and defined the methods to perform CRUD operations.
import java.util.List;

import org.springframework.beans.factory.annotation.Autowired;
import org.springframework.data.redis.core.RedisTemplate;
import org.springframework.stereotype.Repository;

import com.paulsofts.productservices.entity.Product;

@Repository
public class ProductDao {

	/**
	 * The HASH_KEY is same as we give in our entity class
	 * inside @RedisHash("Product") annotation
	 */
	public static final String HASH_KEY = "Product";

	@Autowired
	private RedisTemplate redisTemplate;

	/**
	 * The method opsForHash() return operations performed
	 * on hash values
	 */
	public Product saveProduct(Product product) {
		redisTemplate.opsForHash().put(HASH_KEY, product.getPdtId(), product);
		return product;
	}

	public List<Product> getAllProducts() {
		return redisTemplate.opsForHash().values(HASH_KEY);
	}

	public Product getProductById(int id) {
		return (Product) redisTemplate.opsForHash().get(HASH_KEY, id);
	}

	public String deleteProduct(int id) {
		redisTemplate.opsForHash().delete(HASH_KEY, id);
		return "Product deleted with pdtId: " + id;
	}

}
Step 8- Service layer
We need to define the server layer for our application.
import java.util.List;

import org.springframework.beans.factory.annotation.Autowired;
import org.springframework.stereotype.Service;

import com.paulsofts.productservices.dao.ProductDao;
import com.paulsofts.productservices.entity.Product;

@Service
public class ProductService {

	private final ProductDao productDao;

	public ProductService(@Autowired ProductDao productDao) {
		this.productDao = productDao;
	}

	public Product saveProduct(Product product) {
        return productDao.saveProduct(product);
    }

    public List<Product> getAllProducts() {
        return productDao.getAllProducts();
    }

    public Product getProductById(int id) {
        return productDao.getProductById(id);
    }

    public String deleteProduct(int id) {
        return productDao.deleteProduct(id);
    }
}
Step 9- Controller
In this step, we will create our rest controller.
import java.util.List;
import org.springframework.beans.factory.annotation.Autowired;
import org.springframework.web.bind.annotation.DeleteMapping;
import org.springframework.web.bind.annotation.GetMapping;
import org.springframework.web.bind.annotation.PathVariable;
import org.springframework.web.bind.annotation.PostMapping;
import org.springframework.web.bind.annotation.RequestBody;
import org.springframework.web.bind.annotation.RequestMapping;
import org.springframework.web.bind.annotation.RestController;
import com.paulsofts.productservices.entity.Product;
import com.paulsofts.productservices.service.ProductService;
@RestController
@RequestMapping("/api/product")
public class ProductController {
@Autowired
private ProductService productService;
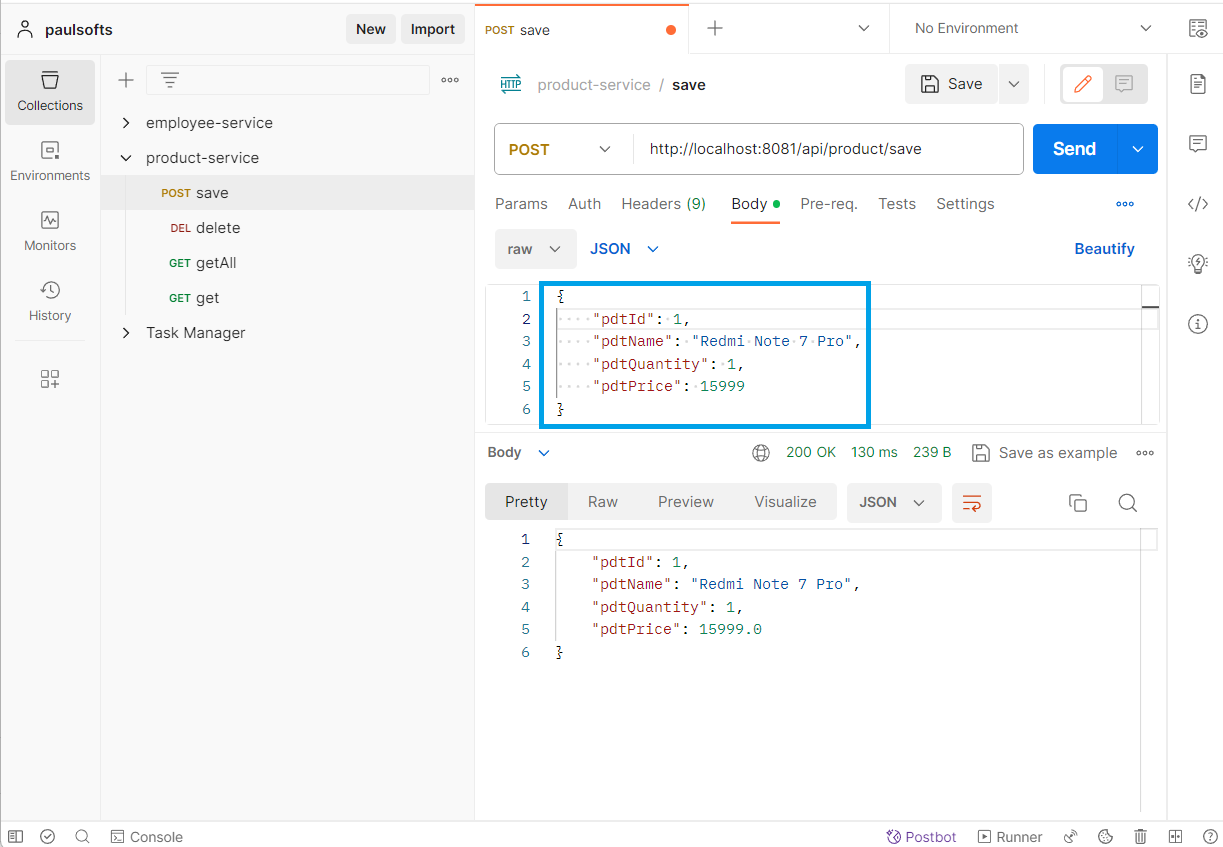
@PostMapping("/save")
public Product saveProduct(@RequestBody Product product) {
return productService.saveProduct(product);
}
@GetMapping("/get")
public List<Product> getAllProducts(){
return productService.getAllProducts();
}
@GetMapping("/get/{pdtId}")
public Product getProduct(@PathVariable int pdtId) {
System.out.println(productService.getProductById(pdtId));
return productService.getProductById(pdtId);
}
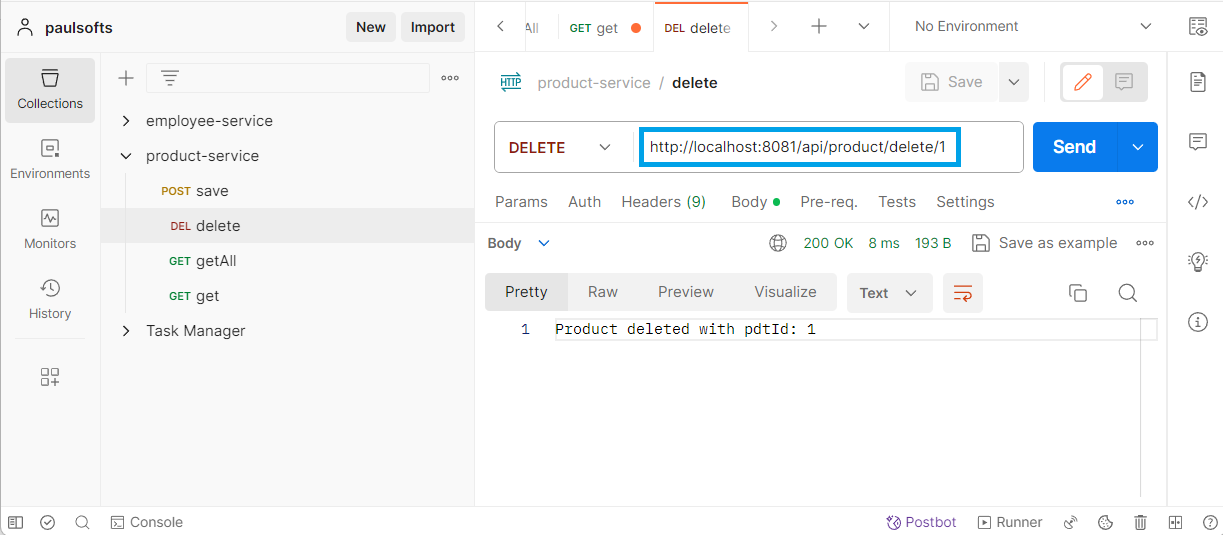
@DeleteMapping("/delete/{pdtId}")
public String deleteProduct(@PathVariable int pdtId) {
return productService.deleteProduct(pdtId);
}
}Step 10- Testing
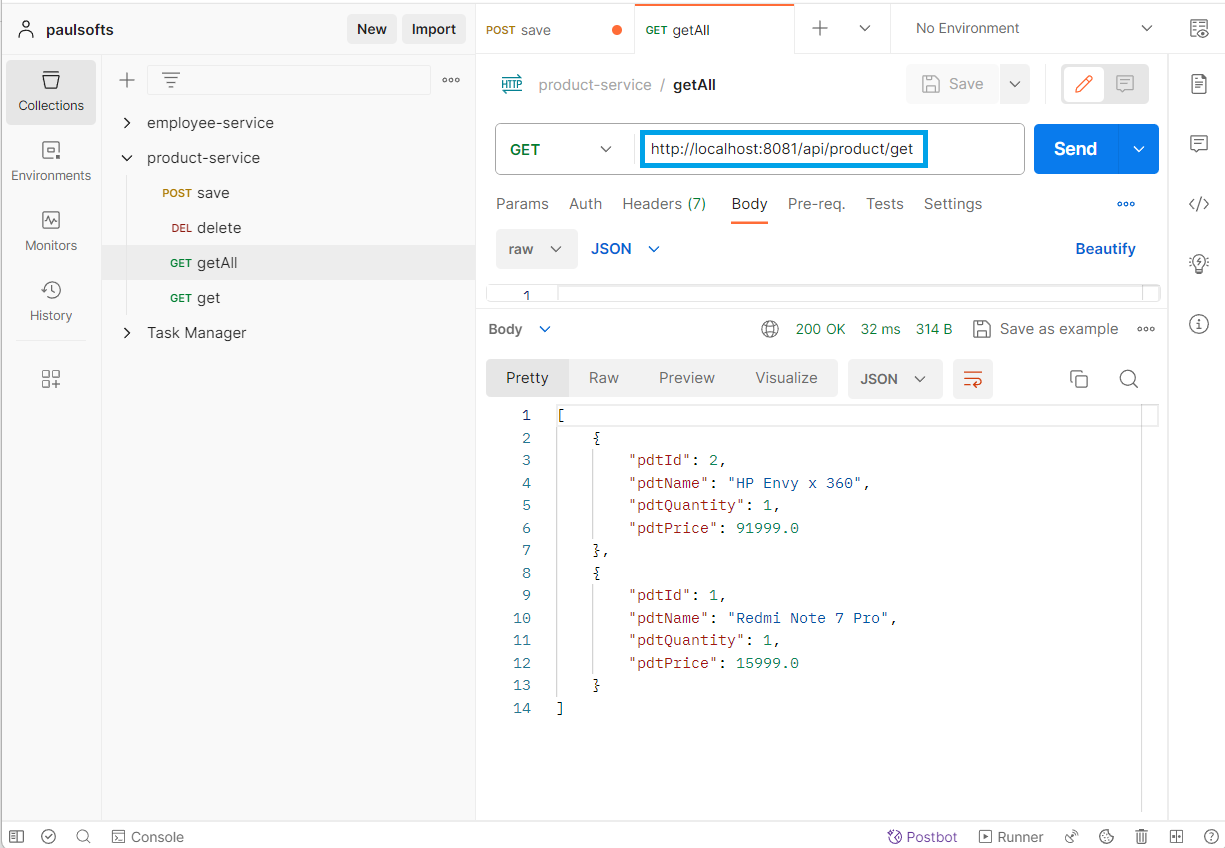
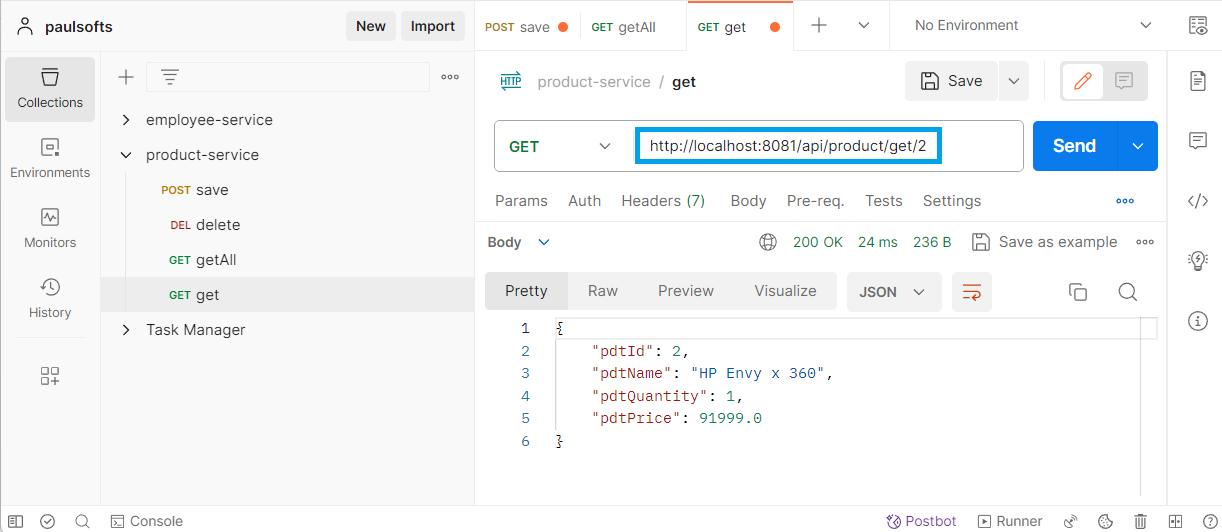
Finally, we need to test out the application. We will be using Postman to test out product-service APIs. Make sure that the Redis server is up and running.
Save request
GetAll request
Get request
Delete request