

API stands for Application Programmable Interface. It is a mechanism that is used for two or more computer programs to communicate with each other using a set of standard protocols. For example, when we try to login to a website, a login api gets called and requests the website’s server for authentication, and the website’s server returns with a response for authentication. This way, our computer system and the website’s server communicate with each other with the help of APIs. The API which follow REST paradigm are called REST API.
Step By Step Implementations
Step 1- Create project structure
First, we will need to create the project structure for our application. We will create all the package structure in our Blog Application. For this, Go to src/main/java > Right-Click > New > Package.

We will create the packages for our controller, model, service, repository, dto and utils classes.(Note: You can also give your own package name)

Step 2- Create User Class
In this step, we will create a model class for User entity. To learn more about the User class attributes. Please, refer How to design Database Schema?. For this, Go to Model Package > Right-Click > New > Class > Create User Class.
package com.paulsofts.blogapplicationservices.model;

/*
 * we have used lambok dependency to create getters,
 * setters and no argument constructors.
 * */
import jakarta.persistence.Column;
import jakarta.persistence.Entity;
import jakarta.persistence.GeneratedValue;
import jakarta.persistence.GenerationType;
import jakarta.persistence.Id;
import jakarta.persistence.Table;
import lombok.Getter;
import lombok.NoArgsConstructor;
import lombok.Setter;

@Entity
@Table(name="user")
@Getter
@Setter
@NoArgsConstructor
public class User {

	@Id
	@Column(name="userId")
	@GeneratedValue(strategy = GenerationType.AUTO)
	private int userId;
	@Column(name="userName")
	private String userName;
	@Column(name="userEmail")
	private String userEmail;
	@Column(name="userPassword")
	private String userPassword;
	@Column(name="userAbout")
	private String userAbout;
}
Step 3- Create UserDto Class
In this step, we will create a UserDto class. DTO stands for Data Transfer Object, these objects move form one layer to another layer and are used to hide the implementation details of a database layer which improves the application security. For example, if we have an endpoint for User class details and the response is not handled properly one can get all the fields of User class even when they are not required which is not a good practice for writing Restful web-service. DTO can overcome this problem easily, we need to define a UserDto class along with the fields which we want to expose to the web-layer(end-user). For this, Go to DTO Package > Right-Click > New > Class > Create UserDto Class.
package com.paulsofts.blogapplicationservices.dto;

import lombok.Getter;
import lombok.NoArgsConstructor;
import lombok.Setter;

/*
 * UserDTO class will be used to transfer data and
 * can be exposed to web-layer
 *
 * User class, we will use only for performing database
 * related operations
 * */

@Getter
@Setter
@NoArgsConstructor
public class UserDto {

	private int userId;
	private String userName;
	private String userEmail;
	private String userPassword;
	private String userAbout;
}
Step 4- Create UserRepository Inteface
In this step, we will create UserRepository interface. The repository classes are used to abstract the persistence(database) layer operations such as create, update, delete, retrieve, search etc. For this, Go to Repository Package > Right-Click > New > Interface > Create UserRepository Interface. We will need to extends UserRepository interface to JpaRepository<T, ID> and need to pass the model class and the wrapper class of type of id used in model class .i.e., JpaRepository<User, Integer>.
package com.paulsofts.blogapplicationservices.repository;

import org.springframework.data.jpa.repository.JpaRepository;

import com.paulsofts.blogapplicationservices.model.User;

/*
 * In the arguments of JpaRepository, we need to pass the model class
 * and the wrapper class of the type of id used in our model class
 * */
public interface UserRepository extends JpaRepository<User, Integer> {

}
Step 5- Create UserService Interface
In this step, we will create UserService interface. The service classes are used to perform all the business logic on the entity class data which are mapped to JPA. For this, Go to Service Package > Right-Click > New > Interface > Create UserService Interface.
package com.paulsofts.blogapplicationservices.service;

import java.util.List;

import com.paulsofts.blogapplicationservices.dto.UserDto;

public interface UserService {

	/*we will be using UserDto to transfer data in
	 * different application layers
	 * */
	public UserDto createUser(UserDto userDto);
	public UserDto updateUser(UserDto userDto, int userId);
	public UserDto getUserById(int userId);
	public List<UserDto> getAllUser();
	public void deleteUser(int userId);

}
Now, we will need to write the corresponding implementation class for UserService interface. We will create UserServiceImpl which will implements the UserService interface. For this, Go to Service Package > Right-Click > New > Class > Create UserServiceImpl Class.
Before moving further, In UserServiceImpl we will implement the methods to create, update, delete and get User, while fetching, updating or deleting a User it maybe possible the specific User is not available in that scenario we need to throw an exception that particular resource is not available. For this, we will create our custom exception handling class. Go to Utils Package > Right-Click > New > Class > Create ResourceNotFoundException Class and add the following code to it.
package com.paulsofts.blogapplicationservices.utils;

public class ResourceNotFoundException extends RuntimeException{

	private String resourceName;
	private String fieldName;
	private long fieldValue;

	public ResourceNotFoundException(String resourceName, String fieldName, long fieldValue) {
		super(String.format("%s Not Found with %s : %s", resourceName, fieldName, fieldValue));
		this.resourceName = resourceName;
		this.fieldName = fieldName;
		this.fieldValue = fieldValue;
	}

}
Now, we will completed the implementation of our UserServiceImpl class.
package com.paulsofts.blogapplicationservices.service;

import java.util.List;
import java.util.stream.Collectors;

import org.springframework.beans.factory.annotation.Autowired;
import org.springframework.stereotype.Service;

import com.paulsofts.blogapplicationservices.dto.UserDto;
import com.paulsofts.blogapplicationservices.model.User;
import com.paulsofts.blogapplicationservices.repository.UserRepository;
import com.paulsofts.blogapplicationservices.utils.ResourceNotFoundException;

@Service
public class UserServiceImpl implements UserService {

	@Autowired
	private UserRepository userRepository;

	@Override
	public UserDto createUser(UserDto userDto) {
		//the data returned from data base is of User object,
		//we need to convert it into UserDto object as our method's return type is UserDto
		User user = this.dtoToUser(userDto);
		User userSavedToDB = this.userRepository.save(user);
		return this.userToDto(userSavedToDB);
	}

	@Override
	public UserDto updateUser(UserDto userDto, int userId) {
		//here, we will be using findById() method and if user is not present then
		//we will be throwing our custom exception ResourceNotFoundException

		//findById() method uses java 8 feature .i.e., Optional Class

		User user = this.userRepository.findById(userId).orElseThrow(
				() -> new ResourceNotFoundException("User", "userId", userId));

		//if User is present we will update it

		user.setUserName(userDto.getUserName());
		user.setUserEmail(userDto.getUserEmail());
		user.setUserAbout(userDto.getUserAbout());
		User updatedUser = this.userRepository.save(user);
		return this.userToDto(updatedUser);
	}

	@Override
	public UserDto getUserById(int userId) {
		User user = this.userRepository.findById(userId).orElseThrow(
				() -> new ResourceNotFoundException("User", "userId", userId));
		return this.userToDto(user);
	}

	@Override
	public List<UserDto> getAllUser() {
		//the userList will contains all the list of users
		List<User> userList = this.userRepository.findAll();
		//we need to convert the userList to userDtoList

		//map() method is java 8 feature which is used to map(transform)
		//one object into another depending on the conditions passed to it

		List<UserDto> userDtoList = userList.stream().map(user -> this.userToDto(user)).collect(Collectors.toList());
		return userDtoList;
	}

	@Override
	public void deleteUser(int userId) {
		User user = this.userRepository.findById(userId).orElseThrow(
				() -> new ResourceNotFoundException("User", "userId", userId));
		this.userRepository.delete(user);
	}

	//this method will convert UserDto to User object .i.e., entity to DTO object
	public User dtoToUser(UserDto userDto) {
		User user = new User();
		user.setUserId(userDto.getUserId());
		user.setUserName(userDto.getUserName());
		user.setUserEmail(userDto.getUserEmail());
		user.setUserAbout(userDto.getUserAbout());
		return user;
	}

	//this method will convert User to UserDto object .i.e., DTO to entity object
	public UserDto userToDto(User user) {
		UserDto userDto = new UserDto();
		userDto.setUserId(user.getUserId());
		userDto.setUserName(user.getUserName());
		userDto.setUserEmail(user.getUserEmail());
		userDto.setUserAbout(user.getUserAbout());
		return userDto;
	}
}
Step 6- Create UserController Class
In this step, we will create UserController class. The controller classes are used to handle the incoming requests. It analyze the request, prepare a model and return the appropriate response to the client.
In controller we need to process the request and return a response to the client(end user) for which we will be use RequestEntity<T> and ResponseEntity<T>. The RequestEntity and the ResponseEntity represents the complete HTTP Response .i.e., it includes the headers, body and the HttpStatus code. In order to request the services we will use GenericRequest and to return the response we will use GenericResponse. For thsi, Go to Utils Package > Right-Click > New > Create Two Class GenericRequest And GenericResponse Class.
Now, add the following lines of code to the GenericRequest class:
package com.paulsofts.blogapplicationservices.utils;

import lombok.AllArgsConstructor;
import lombok.Getter;
import lombok.NoArgsConstructor;
import lombok.Setter;

@Getter
@Setter
@NoArgsConstructor
@AllArgsConstructor
public class GenericRequest<T> {
	private T t;

}
Similarly, we will add the following lines of code to our GenericResponse class:
package com.paulsofts.blogapplicationservices.utils;

import lombok.AllArgsConstructor;
import lombok.Getter;
import lombok.NoArgsConstructor;
import lombok.Setter;

@Getter
@Setter
@NoArgsConstructor
@AllArgsConstructor
public class GenericResponse<T> {
	//T is the generic type which we will take as input
	private T t;
	private String message;
	private String response;

}
Now, we will complete the implementation of our UserController class.
package com.paulsofts.blogapplicationservices.controller;

import java.util.List;

import org.springframework.beans.factory.annotation.Autowired;
import org.springframework.http.HttpStatus;
import org.springframework.http.ResponseEntity;
import org.springframework.web.bind.annotation.DeleteMapping;
import org.springframework.web.bind.annotation.GetMapping;
import org.springframework.web.bind.annotation.PathVariable;
import org.springframework.web.bind.annotation.PostMapping;
import org.springframework.web.bind.annotation.RequestBody;
import org.springframework.web.bind.annotation.RequestMapping;
import org.springframework.web.bind.annotation.RestController;

import com.paulsofts.blogapplicationservices.dto.UserDto;
import com.paulsofts.blogapplicationservices.service.UserServiceImpl;
import com.paulsofts.blogapplicationservices.utils.GenericRequest;
import com.paulsofts.blogapplicationservices.utils.GenericResponse;


@RestController
@RequestMapping("/api/users")
public class UserController {

	@Autowired
	private UserServiceImpl userServiceImpl;

	//it's just a welcome api to check whether application is running or not
	@GetMapping("/welcome")
	public String welcome() {
		return "Welcome to paulsofts";
	}
	//we will be using custom GenericRequest<T> class to request the services
	//which will take the custom type of argument, here it is taking UserDto

	//similarly, we will be using custom GenericResponse<T> class to return the response
	//it will take three argument- GenericType, message and response
	//which we have entered in the constructor of GenericResponse<T>
	@PostMapping("/create")
	public ResponseEntity<GenericResponse<UserDto>> createUser(@RequestBody GenericRequest<UserDto> request){
		UserDto createdUserDto = this.userServiceImpl.createUser(request.getT());
		return new ResponseEntity<GenericResponse<UserDto>>(new GenericResponse<UserDto>(createdUserDto, "user created", "OK"), HttpStatus.CREATED);
	}

	@PostMapping("/update/{userId}")
	public ResponseEntity<GenericResponse<UserDto>> updateUser(@RequestBody GenericRequest<UserDto> request, @PathVariable("userId") int userId){
		UserDto updatedUserDto = this.userServiceImpl.updateUser(request.getT(), userId);
		return new ResponseEntity<GenericResponse<UserDto>>(new GenericResponse<UserDto>(updatedUserDto, "user updated", "OK"), HttpStatus.OK);
	}

	@GetMapping("/get/{userId}")
	public ResponseEntity<GenericResponse<UserDto>> getUserById(@PathVariable("userId") int userId){
		UserDto userDto = this.userServiceImpl.getUserById(userId);
		return new ResponseEntity<GenericResponse<UserDto>>(new GenericResponse<UserDto>(userDto, "user", "OK"), HttpStatus.OK);
	}

	@GetMapping("/get")
	public ResponseEntity<GenericResponse<List<UserDto>>> getAllUser(){
		List<UserDto> userDtoList = this.userServiceImpl.getAllUser();
		return new ResponseEntity<GenericResponse<List<UserDto>>>(new GenericResponse<List<UserDto>>(userDtoList, "user list", "OK"), HttpStatus.OK);
	}

	//as return type of deleteUser() method of service class is void
	//we will be using String as type of our GenericResponse class
	@DeleteMapping("/delete/{userId}")
	public ResponseEntity<GenericResponse<String>> deleteUser(@PathVariable("userId") int userId){
		this.userServiceImpl.deleteUser(userId);
		return new ResponseEntity<GenericResponse<String>>(new GenericResponse<String>("userId " + userId, "user deleted", "OK"), HttpStatus.OK);
	}

}
Step 7- Run Blog Application
In this step, we will run to check whether our application is working fine or not. For this, Go to Main Class(BlogApplicationServicesApplication) > Right-Click > Run As > Java Application.
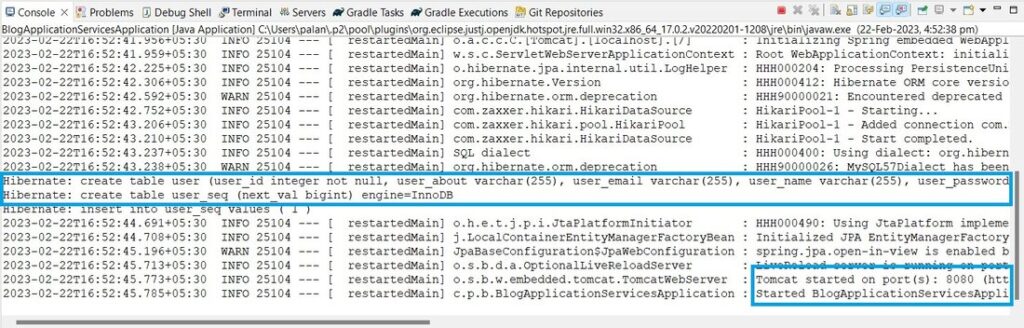
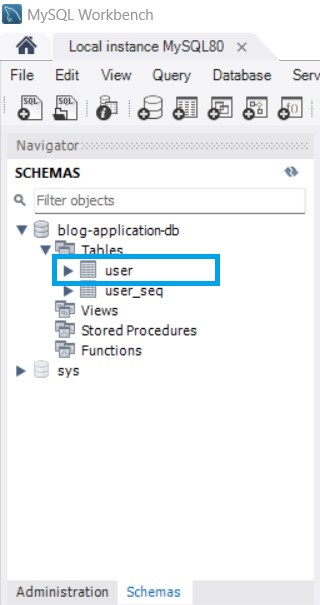
As we can see, user table has been created in the database and the application started at port 8080. We can also check our database for the table.
Step 8- Test User API
In this step, we will test our User API. We will be using Postman to test our apis. First, we will create a user, then update it, fetch it and delete it.(For better understanding Please, go through complete video in full-screen mode)