Spring Boot is an opinionated spring-based framework that auto-configures web applications with the help of starter packages. Along with the default embedded server, i.e., Tomcat, Spring Boot also comes with the default embedded database. The default database for Spring Boot is H2 DB. Similarly to the default embedded server, we can change the default embedded database to another database. In order to configure the database for the Spring Boot application, we need to define the database configurations in the application.properties file.
In this tutorial, we will be configuring the MySQL database for our blog application spring boot project. To learn how to create a Spring Boot project and add dependencies, please refer to How to Create a Spring Boot Project. We have already added the required dependencies for our blog application.
Steps to configure database to Spring Boot project
Step 1- Add Dependencies
In order to make database connections to the Spring Boot project, we will need to add the dependencies in the pom.xml file. For this, we will need the MySQL Connector and Spring Data JPA dependencies.
<dependencies>
	<dependency>
		<groupId>org.springframework.boot</groupId>
		<artifactId>spring-boot-starter-data-jpa</artifactId>
	</dependency>
	<dependency>
			<groupId>com.mysql</groupId>
			<artifactId>mysql-connector-j</artifactId>
			<scope>runtime</scope>
	</dependency>
</dependencies>
Step 2- Database Configurations
In this step, we will be adding the database configurations to our application.properties file. In the properties file, we need to write the configurations in the form of a key-value pair. For example, server.port=8080, Here, key is server.port, and corresponding value is 8080.
We will be adding the database configuration details, such as port number, database address, etc. For this, go to the src > main > resources > application.properties file and add the following database configurations.
#In application.properties file we used to application configurations in key-value pair form
#For example, below server.port will act as key and 8080 will act as value
#Our blog-application-service will run on port-8080
server.port=8080

#DB Configurations
spring.datasource.url=jdbc:mysql://localhost:3306/blog-application-db
spring.datasource.username=root
spring.datasource.password=root

#Hibernate Dialect
spring.jpa.properties.hibernate.dialect=org.hibernate.dialect.MySQLDialect

#the ddl-auto=update will create the schema automatically
spring.jpa.hibernate.ddl-auto=update
#this will show the running sql queries in the console window
spring.jpa.show-sql=true
Step 3- Run Application
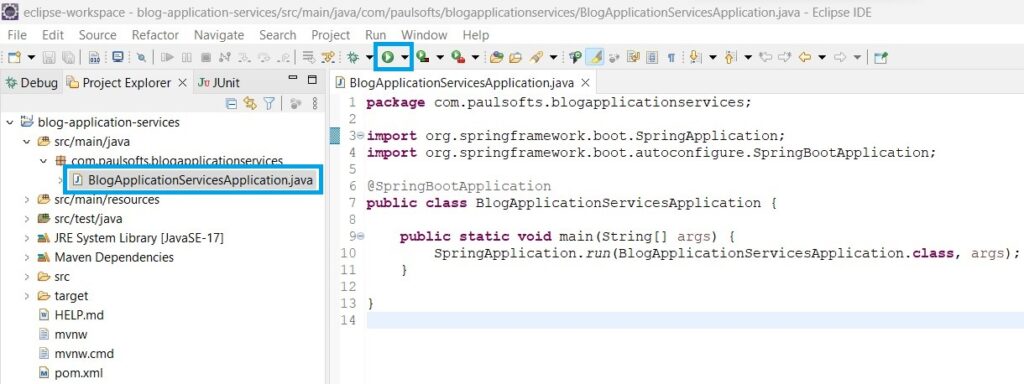
Now, we will need to run our blog application as a Java application to check whether it is connected to a database or not. For this, go to src/main/java > BlogApplicationServiceApplication.java (main class) > Click on Run.

Output-

Im very happy to find this web site. I need to to thank you for ones time for this particularly wonderful read!! I definitely liked every bit of it and I have you saved to fav to check out new stuff on your website.
Thank you! I’m glad to know it was helpful.