

Spring Boot is built on the top of Spring framework which means it supports all the features of Spring framework. Spring Boot makes it easy to create standalone, production-grade spring based application that you can “Just Run”. As the standard definition says, Spring Boot provides a production-ready environment, which enables developers to focus more on business logic than configuring projects, setting up servers, etc.
Maven is a build and dependency management tool from Apache Software Foundation which is based on POM (Project Object Model). It enable us to declare all the dependencies in a file called pom.xml and whenever we run the maven command it looks for all the jars and configuration an application requires in the maven central repository and add them to the application classpath.
Benefits of Maven
- Maven is useful in creating the right project structure.
- It adds the correct set of jars and configuration required by the project.
- It also helps in project build and deployment.
We can create a Spring Boot project in the following ways:
- By using Spring Initializr. To learn more about how to create a Spring Boot project using Spring Initializer, please refer to How to Create a Spring Boot Project?
- Using STS (Spring Tool Suite)
- Creating a Maven project and adding the Spring Boot starter dependencies.
Steps to create a Spring Boot project in Eclipse using Maven
Step 1: Create Maven Project
First we will create a Maven project in our Eclipse IDE. For this, go to File > New > Project.

Once we click on Project, Eclipse will open a project wizard, and we need to select Maven Project and click on Next.

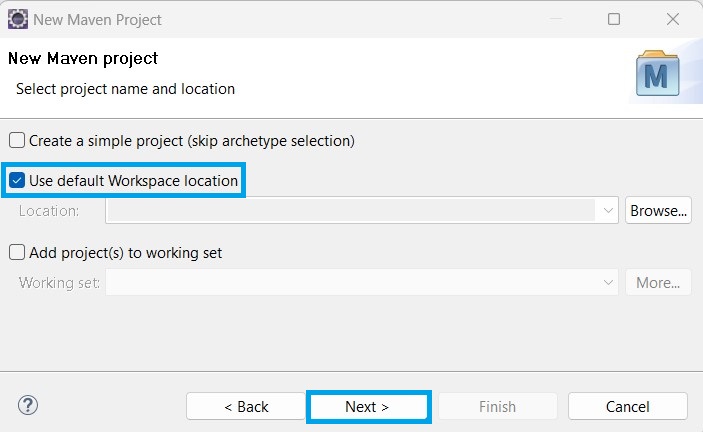
After we click on Next, a new popup will appear asking about the project location (here, we are choosing the default eclipse-workspace location) and clicking on Next.
Once we click Next, it will ask for the archetypes. We are choosing maven.archetype.quickstart for our project.

After we click Next, we need to add the archetype parameters, in which we need to specify groupId and artifactid.

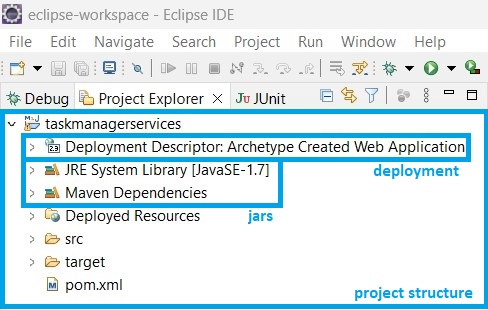
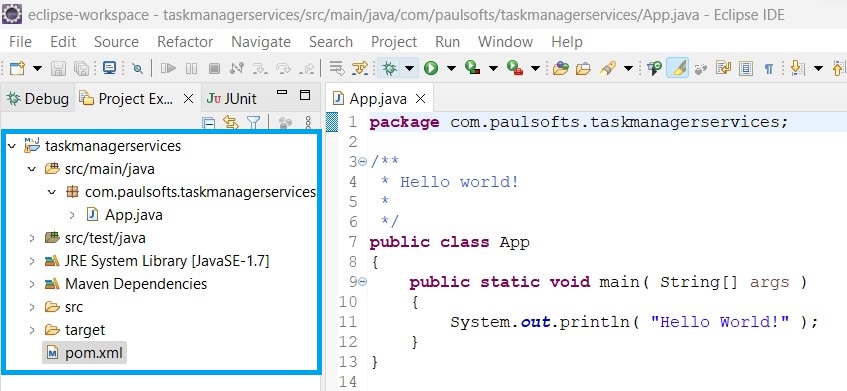
As we click on Finish, Maven will start creating the project and add the required jars and dependencies, and our Maven project gets created.
Step 2- Updating pom.xml File
In this step, we need to update our pom.xml file for converting the Maven project to Spring Boot project. We will be using the following pom.xml file.
Note: While updating the pom.xml file make sure to change the application configurations such as groupId, artifactId etc according to your project.
<?xml version="1.0" encoding="UTF-8"?>

<project xmlns="http://maven.apache.org/POM/4.0.0" xmlns:xsi="http://www.w3.org/2001/XMLSchema-instance" xsi:schemaLocation="http://maven.apache.org/POM/4.0.0
  http://maven.apache.org/xsd/maven-4.0.0.xsd">
	<modelVersion>4.0.0</modelVersion>

	<groupId>com.paulsofts</groupId>
	<artifactId>taskmanagerservices</artifactId>
	<version>0.0.1-SNAPSHOT</version>

	<name>taskmanagerservices</name>

	<!-- adding starter parent -->
	<parent>
		<groupId>org.springframework.boot</groupId>
		<artifactId>spring-boot-starter-parent</artifactId>
		<version>3.0.2</version>
		<relativePath /> <!-- lookup parent from repository -->
	</parent>

	<!-- adding java version -->
	<properties>
		<java.version>17</java.version>
	</properties>

	<dependencies>

		<!-- adding starter web dependency -->
		<dependency>
			<groupId>org.springframework.boot</groupId>
			<artifactId>spring-boot-starter-web</artifactId>
		</dependency>
		<!-- adding data jpa dependency -->
		<dependency>
			<groupId>org.springframework.boot</groupId>
			<artifactId>spring-boot-starter-data-jpa</artifactId>
		</dependency>
		<!-- adding mysql connector dependency -->
		<dependency>
			<groupId>com.mysql</groupId>
			<artifactId>mysql-connector-j</artifactId>
			<scope>runtime</scope>
		</dependency>
		<!-- adding starter test dependency -->
		<dependency>
			<groupId>org.springframework.boot</groupId>
			<artifactId>spring-boot-starter-test</artifactId>
			<scope>test</scope>
		</dependency>
	</dependencies>

	<build>
		<!-- adding plugins -->
		<plugins>
			<plugin>
				<groupId>org.springframework.boot</groupId>
				<artifactId>spring-boot-maven-plugin</artifactId>
				<configuration>
					<excludes>
						<exclude>
							<groupId>org.projectlombok</groupId>
							<artifactId>lombok</artifactId>
						</exclude>
					</excludes>
				</configuration>
			</plugin>
		</plugins>
	</build>
</project>
In the above pom.xml file, we have added the spring-boot-starter-data-jpa dependency, and for configuring the jpa and database properties, we need to have application.properties. We need to go to project root directories and create the following directory structure: src/main/resources. For this, go to Project Root Directory > src/main/java > Right-Click > Properties.
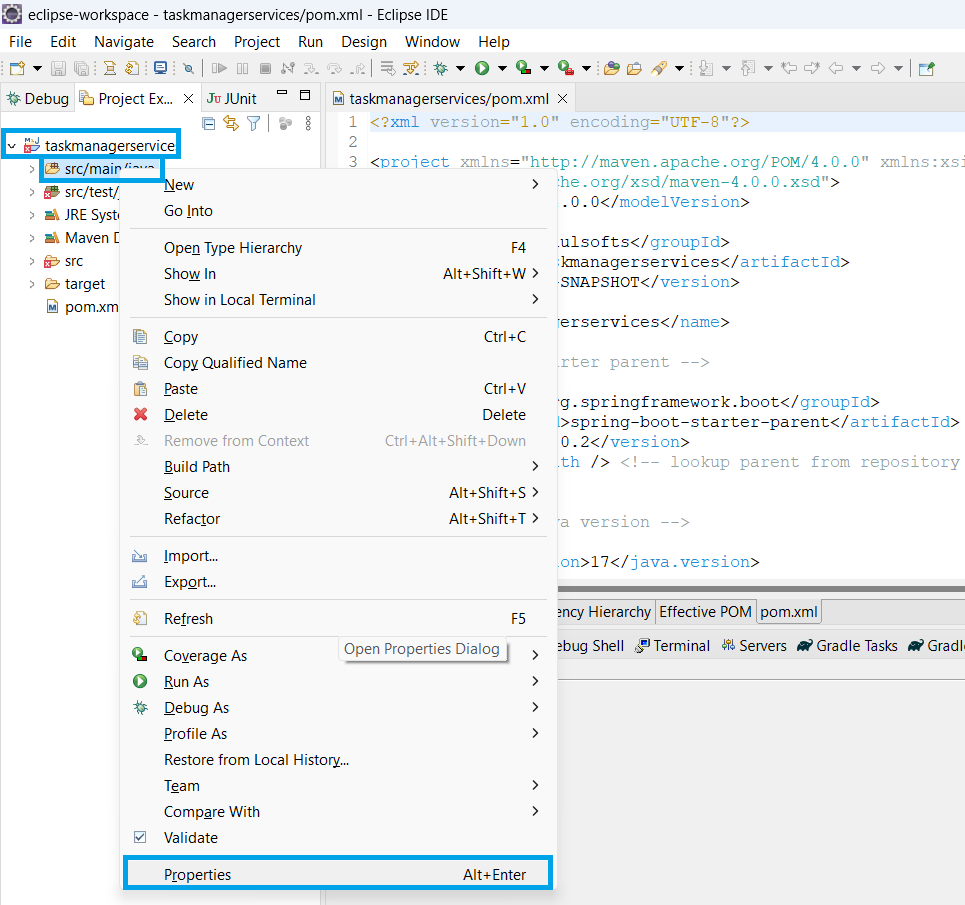
Once we click on Properties, it will open a properties popup window where we need to click on the location icon.
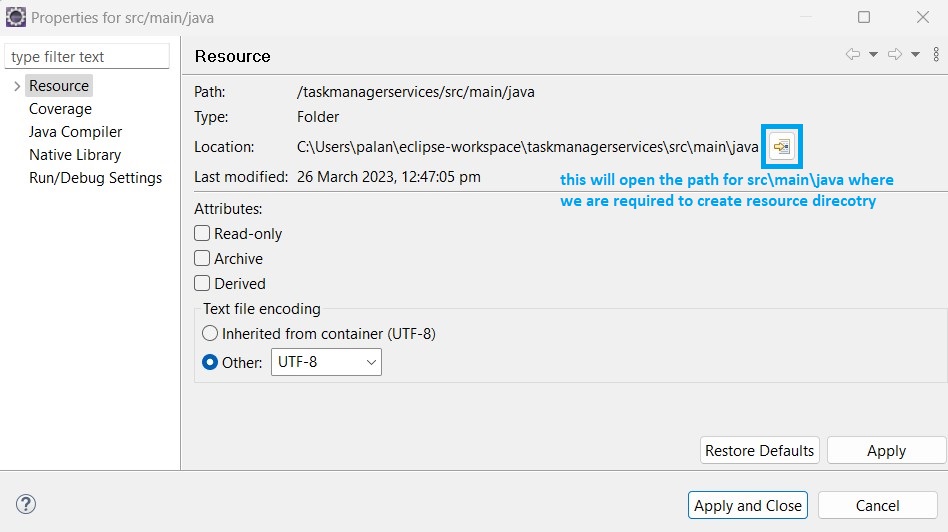
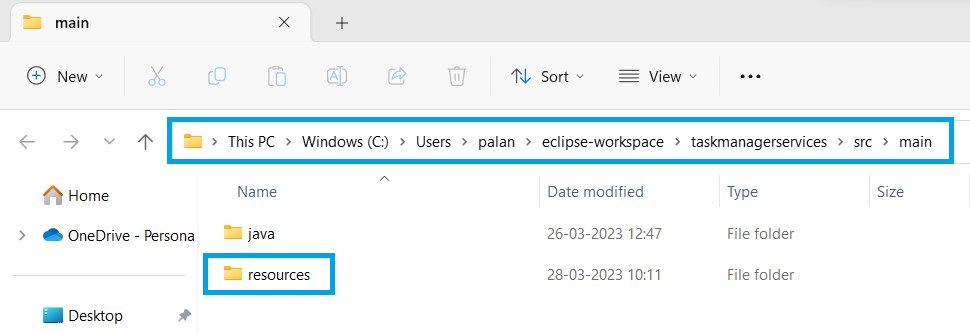
At the above location, we create a directory and name it resources.
After we have created the resources directory in src\main we have to reload the project in our Eclipse IDE. For this, we will first delete the project from only the eclipse workspace.
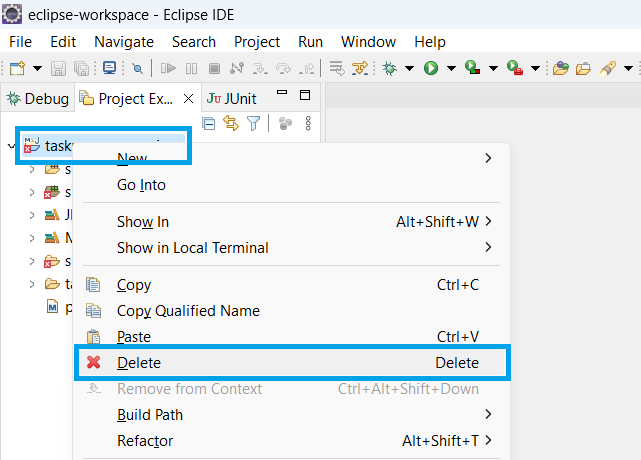
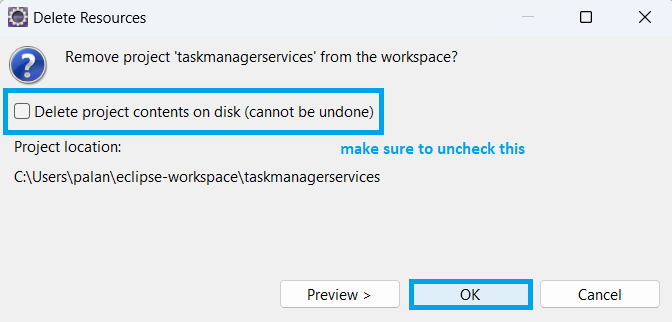
Once we click on Delete, a window will pop up asking about deleting projects from workspace. Make sure not to delete projects from the disc.
Step 3- Reloading Project In Eclipse
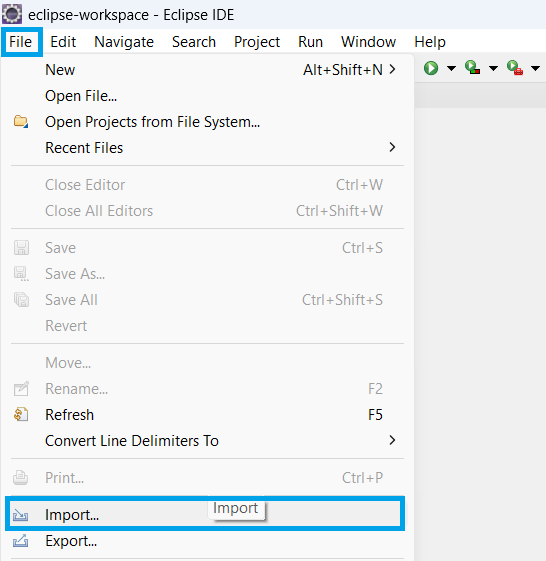
In this step, we need to import our project into the Eclipse IDE. For this, go to File > Import.
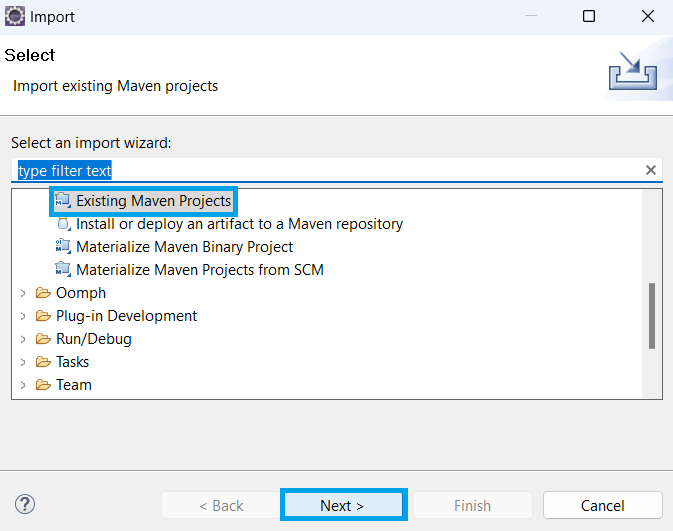
After this, we need to choose Existing Maven Projects and click Next.
Once we click on Next, we need to Browse to our application and click on Finish.
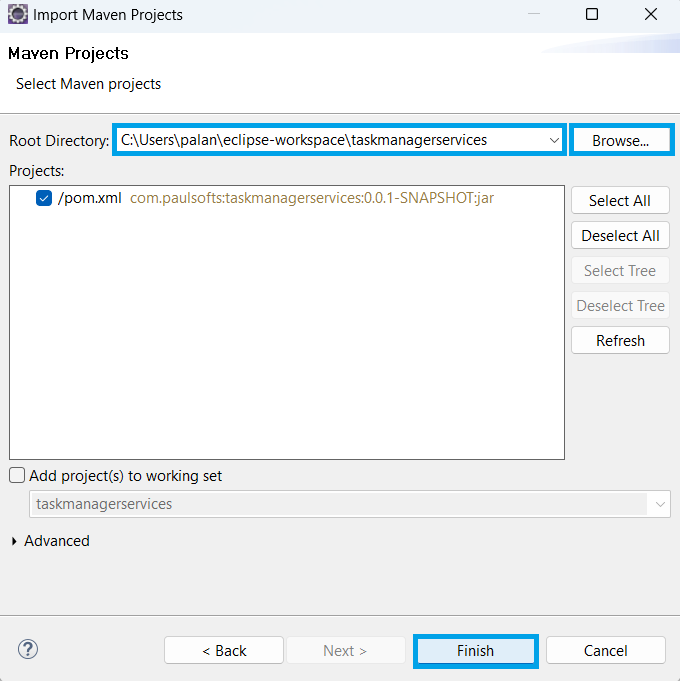
After we click Finish, our project will get imported into our IDE workspace.
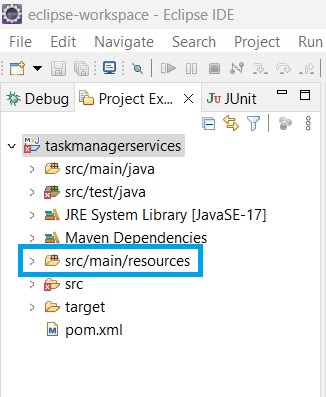
Above we can see our project has been imported successfully and src/main/resource directory is also imported correctly.
Step 4- Create application.properties File
In this step, we will create application.properties file which is required for spring-boot-starter-data-jpa dependency. For this, go to src/main/resources > Right-Click > New > Others.
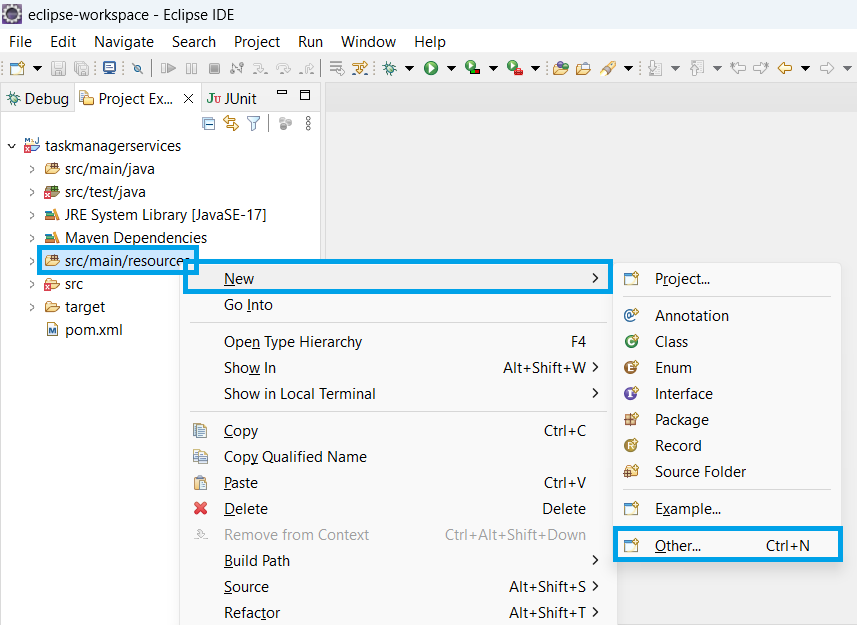
After we click on Other, a popup will come where we need to choose File and click Next.
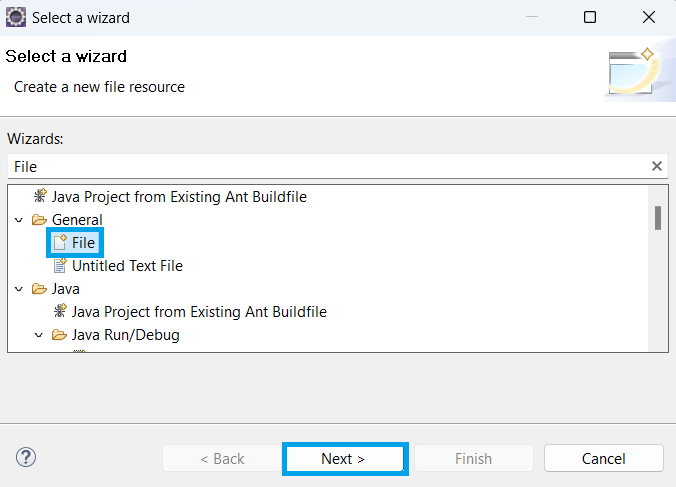
On clicking Next, a popup will appear where we will create a file and name it application.properties.
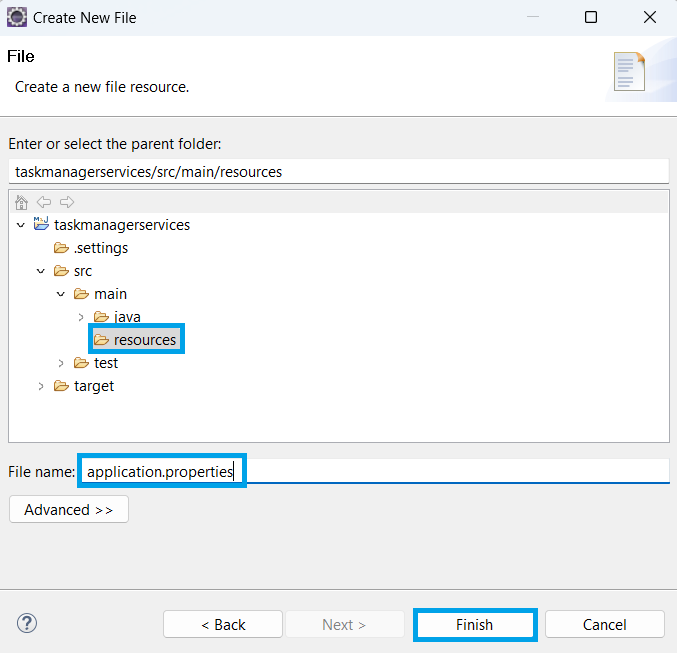
As we click on Finish, our spring boot project structure is complete.

Step 5- Configure Database
As we have added the spring-boot-starter-data-jpa and mysql-connector dependencies, we need to configure the database in our application. For this, go to the application.properties file and add the database configuration. Please make sure to update the database credentials according to your own database.
#In application.properties file we used to application configurations in key-value pair form
#For example, below server.port will act as key and 8080 will act as value
server.port=8080

#DB Configurations
spring.datasource.url=jdbc:mysql://localhost:3306/task-manager-db
spring.datasource.username=root
spring.datasource.password=root

#Hibernate Dialect
spring.jpa.properties.hibernate.dialect=org.hibernate.dialect.MySQL57Dialect

#the ddl-auto=update will create the schema automatically
spring.jpa.hibernate.ddl-auto=update
#this will show the running sql queries in the console window
spring.jpa.show-sql=true
After adding the database configuration we need to update our project. For this, go to Project Root Directory > Right-Click > Maven > Update Project.

Step 6- Setting App And AppTest File
In this step, we will setup the main class file, which is required for the Spring Boot application. As we have updated the pom.xml file, we have also updated the spring-boot-starter-test dependency, which is causing the error in the AppTest.java file. First, we will remove the errors from AppTest.java. To do this, we need to add the following code to our AppTest.java file:
package com.paulsofts.taskmanagerservices;

import org.junit.jupiter.api.Test;
import org.springframework.boot.test.context.SpringBootTest;

/**
 * we have added the @SpringBootTest annotation our AppTest
 * which makes class life cycle to be managed by spring
 */
@SpringBootTest
public class AppTest
{
    /**
     * Rigorous Test :-)
     */
	@Test
	void contextLoads() {
	}
}
As we can see now, the errors are gone.

Now, we will configure our main class in our Spring Boot application. For this, go to App.java file and add the following code:
package com.paulsofts.taskmanagerservices;

import org.springframework.boot.SpringApplication;
import org.springframework.boot.autoconfigure.SpringBootApplication;

@SpringBootApplication
public class App {

    public static void main( String[] args ){
        SpringApplication.run(App.class, args);
    }
}
Step 7- Test Application
We have completely created the Spring Boot application using Eclipse and Maven. Now, we will test our application. For this, go to the main class (here, App.java) > Right-Click > Run As > Java Application. We can see that our application has started successfully.
