

In Jenkins, a pipeline is a workflow with a group of events or jobs that are linked to each other in a sequence. The Jenkins pipeline is a process of continuous delivery automation using Jenkins jobs (items). In the Jenkins pipeline, each job contains some processing inlets and outlets. For example, Build->Deploy->Test->Release are the different Jenkins jobs that are interlinked with each other in a single pipeline.
Jenkins pipeline architecture
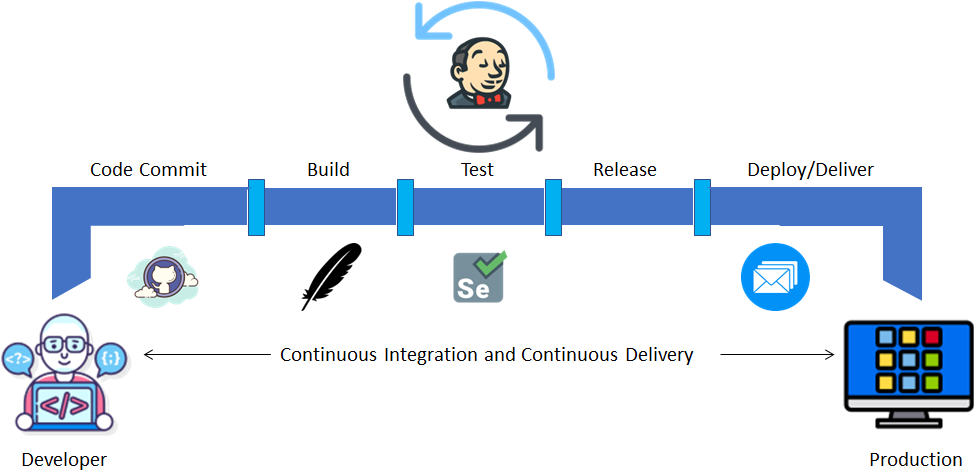
As we know, in a Jenkins pipeline, multiple jobs are interlinked to each other. Once we commit our code to the source code repository (Git or SVN), it moves to the build job. Once the build is completed, it moves to the test job, and so on to the release job, which finally deploys to production.
The advantage of the Jenkins pipeline is that if our code fails at any intermediate job, it will not move to the other job. For example, if our code fails at the build event, it will not move to further events or jobs, and in this way, we make our code or application ready for production.
Types of Jenkins pipeline
- Build pipeline
- Declarative pipeline
- Scripted pipeline
| Build pipeline | Declarative/Scripted pipeline |
| When we have a small number of jobs, such as development, testing, and production, we should use the build pipeline plugin. | If our application has multiple jobs such as development, code review, unit testing, coverage testing, integration testing, packaging, building, etc., then we go for either a declarative or scripted pipeline. |
Note: In the case of a declarative pipeline, we need to write a Jenkins file as part of our code, which we can commit to our source code repository and reuse. In the case of a scripted pipeline, in the Jenkins configure section, we need to add the scripts, and those scripts are written in Groovy syntax.
Steps to create Jenkins pipeline
In the below example, we are going to create a build plugin pipeline to understand the workflow of the Jenkins pipeline.
Step 1- Create Jenkins Job
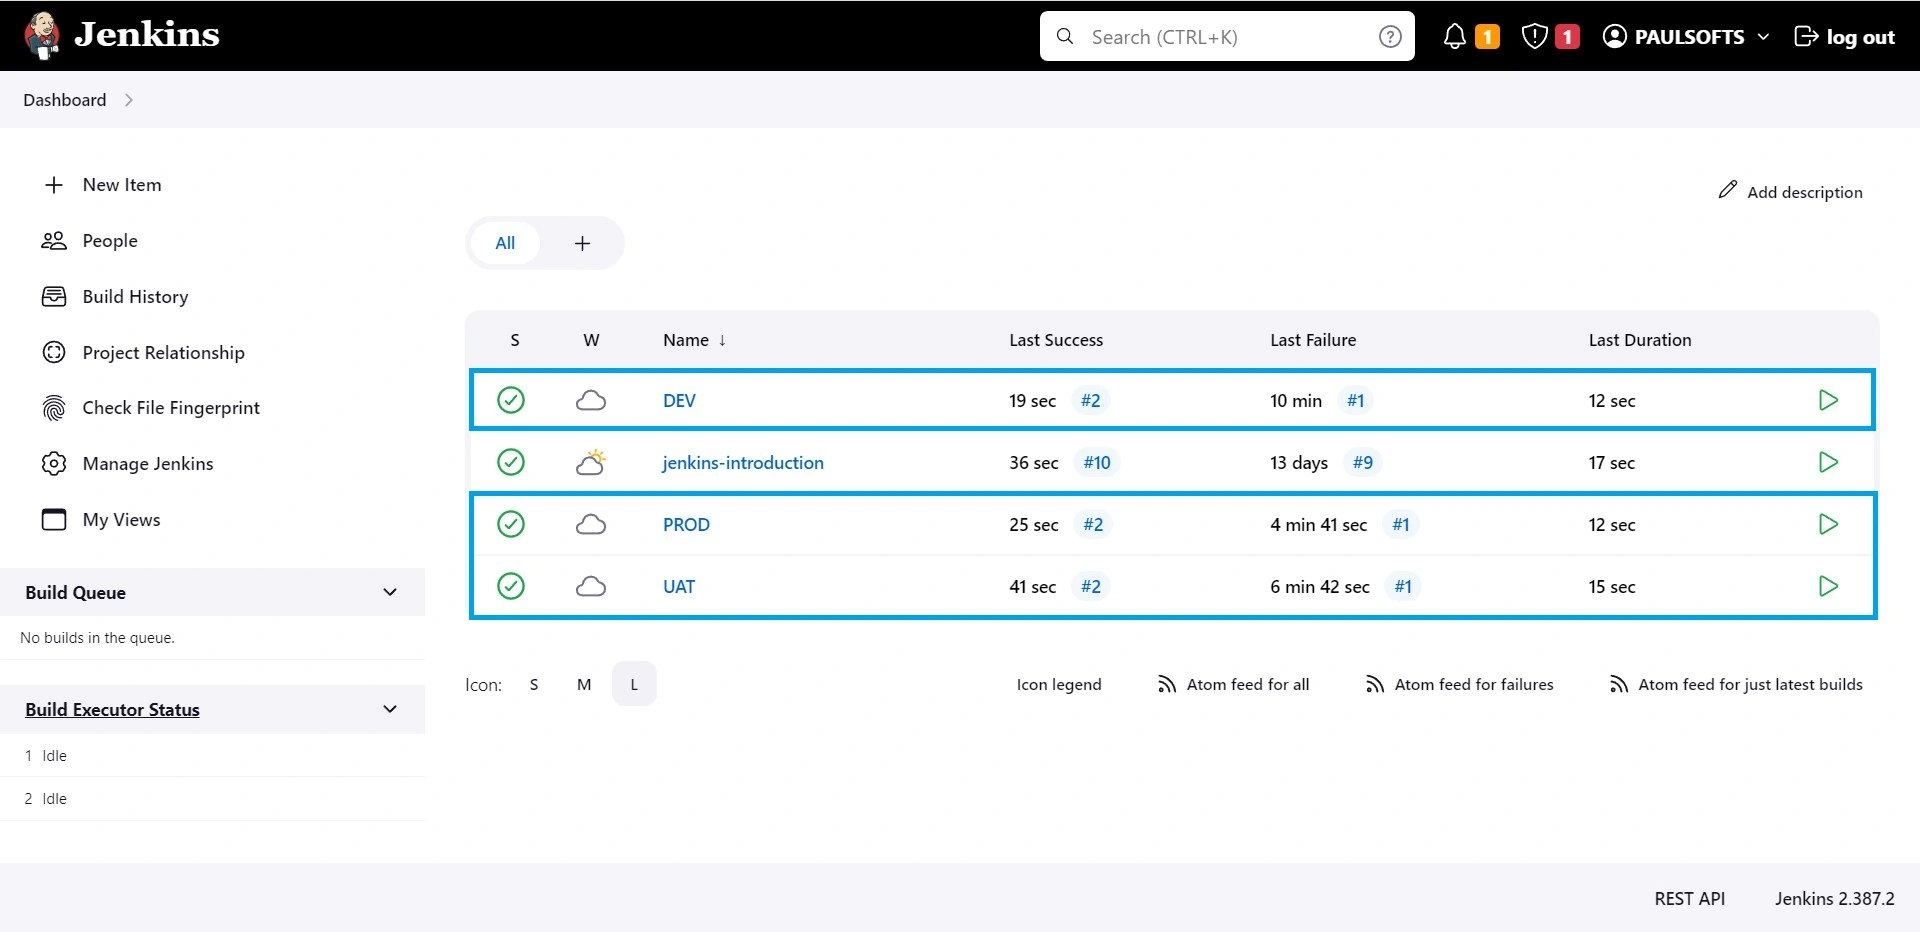
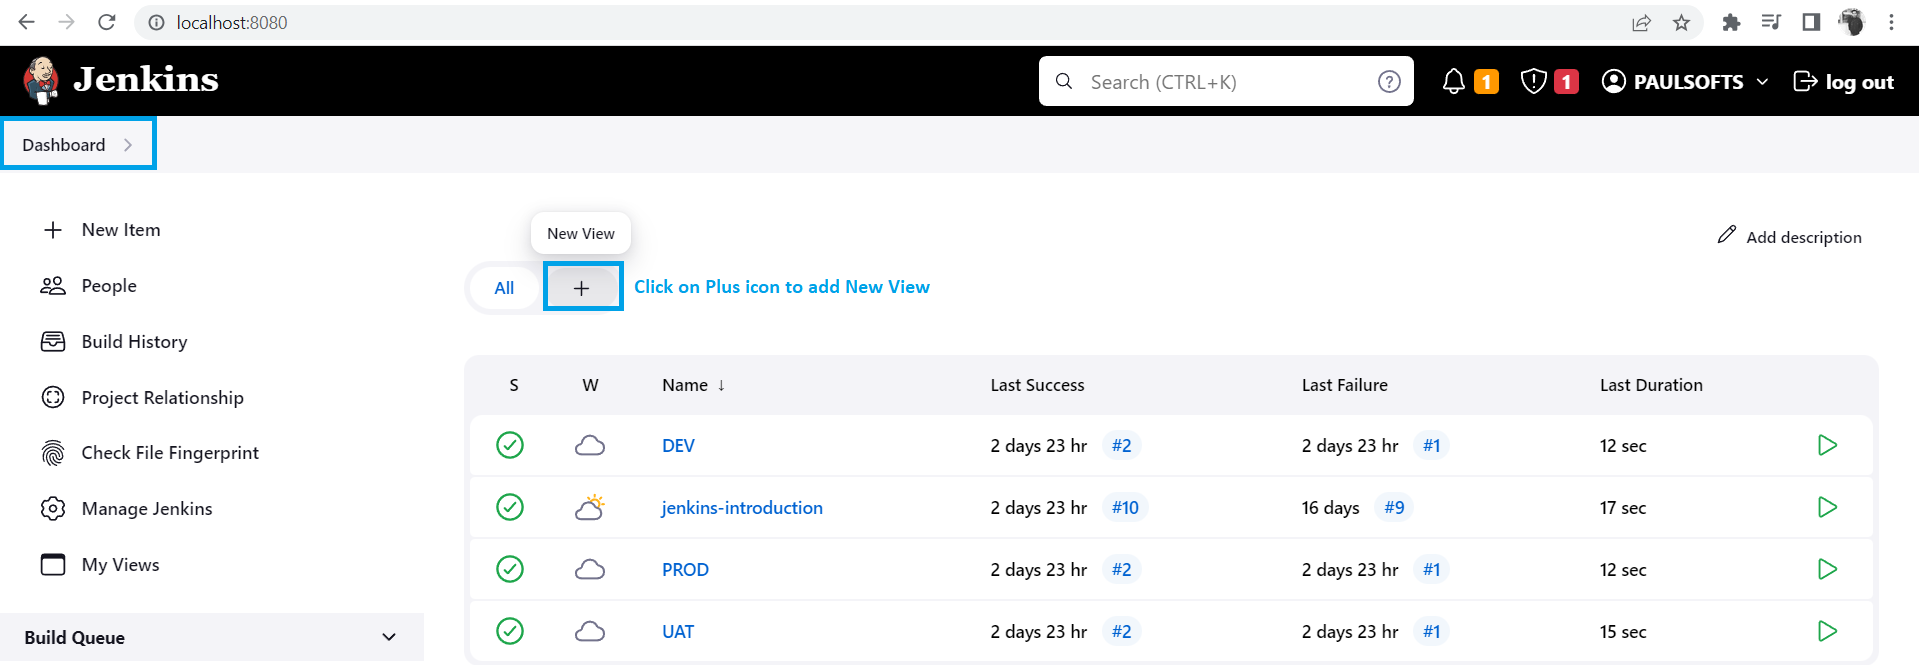
First, we need to create a Jenkins job. In our example, we are going to create three different Jenkins jobs, namely DEV, UAT, and PROD. To learn how to create a Jenkins job, please refer to Jenkins: How to Integrate Jenkins with GitHub. Once we have created all three required jobs, we will have our Jenkins dashboard as follows:
Step 2- Add Build Plugin Pipeline
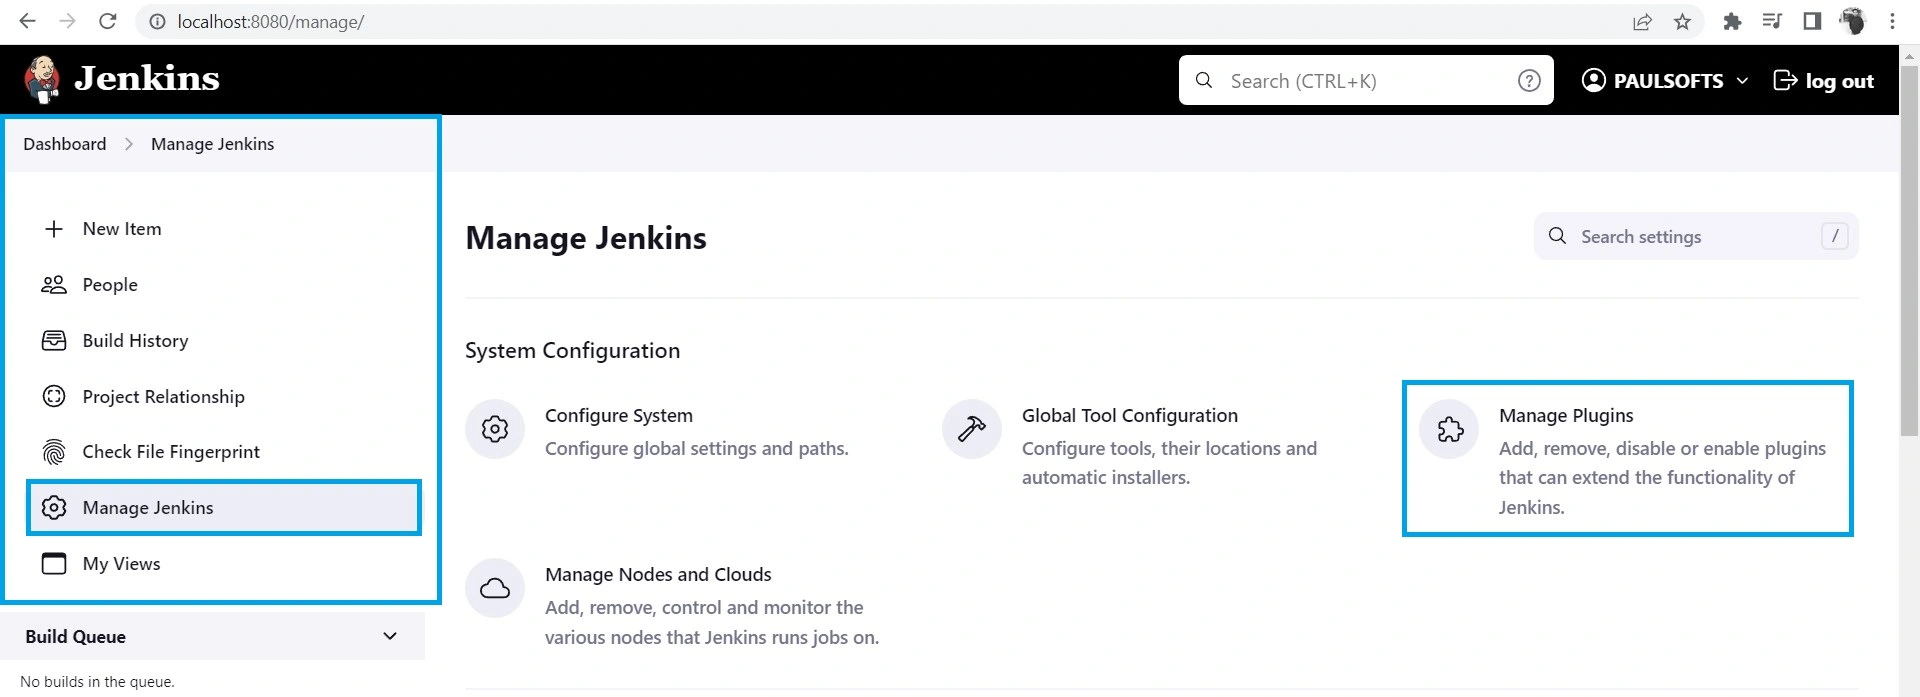
Before creating a Jenkins pipeline, we need to configure the plugins required for the pipeline. i.e., build the plugin pipeline. For this, go to Dashboard > Manage Jenkins > Manage Plugins.
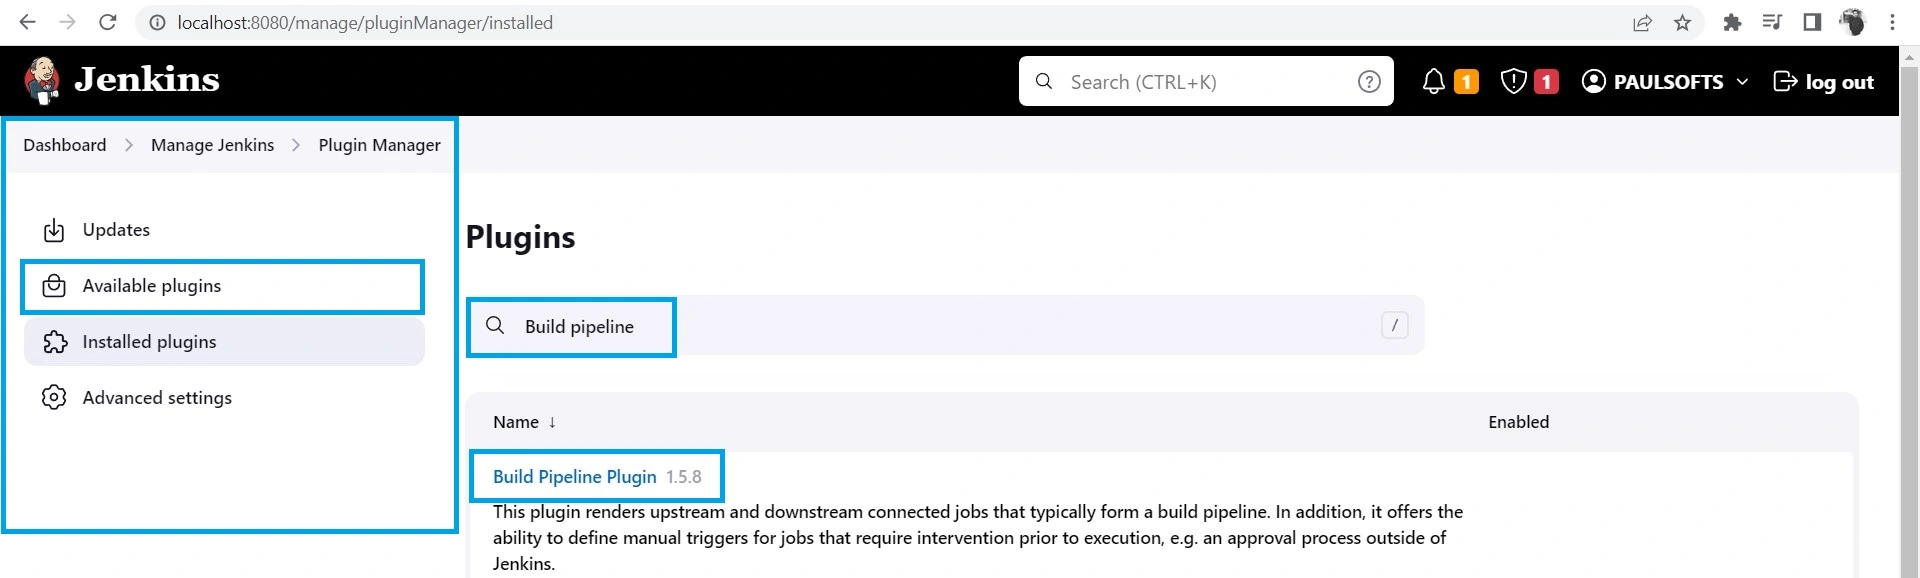
After we click on Manage Plugins, we need to go to Available Plugins > Search for Build Pipeline. Make sure to search in the Available Plugins tab; we have already installed it, which is why it is showing in the Installed Plugins section.
Once we install it, Jenkins will perform a restart, and we are good to use the Build Pipeline plugin.
Step 3- Create Jenkins pipeline
In this step, we create our Jenkins pipeline and link multiple jobs to it. After the Build pipeline plugin is installed, we go to Jenkins Dashboard > Click on the Plus icon > Add a New View.
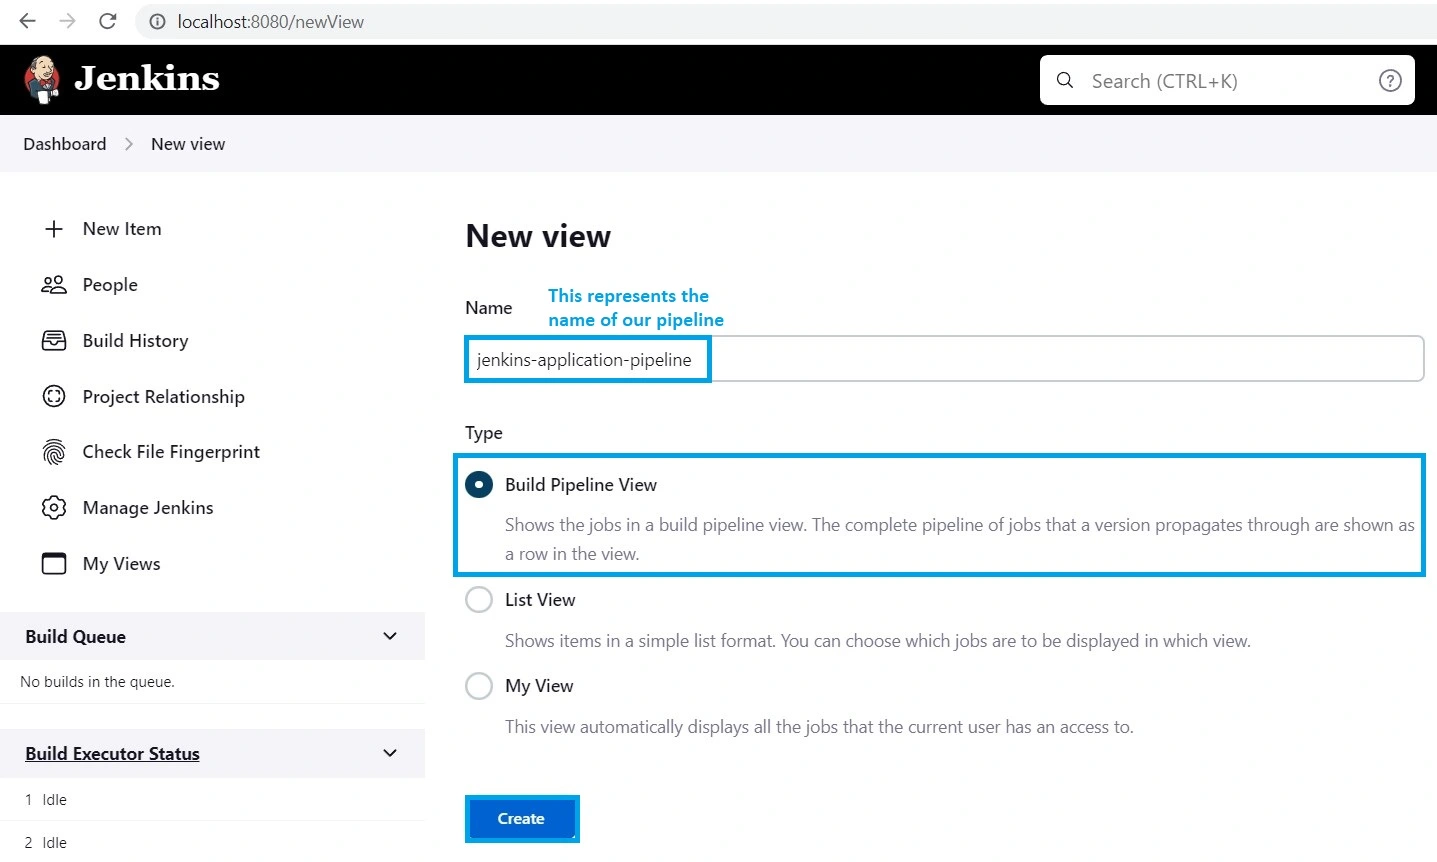
This will pop up a window asking for details about our pipeline, such as Name and Type. After adding these details, click on Create.
Step 3.1- Configure DEV in Jenkins pipeline
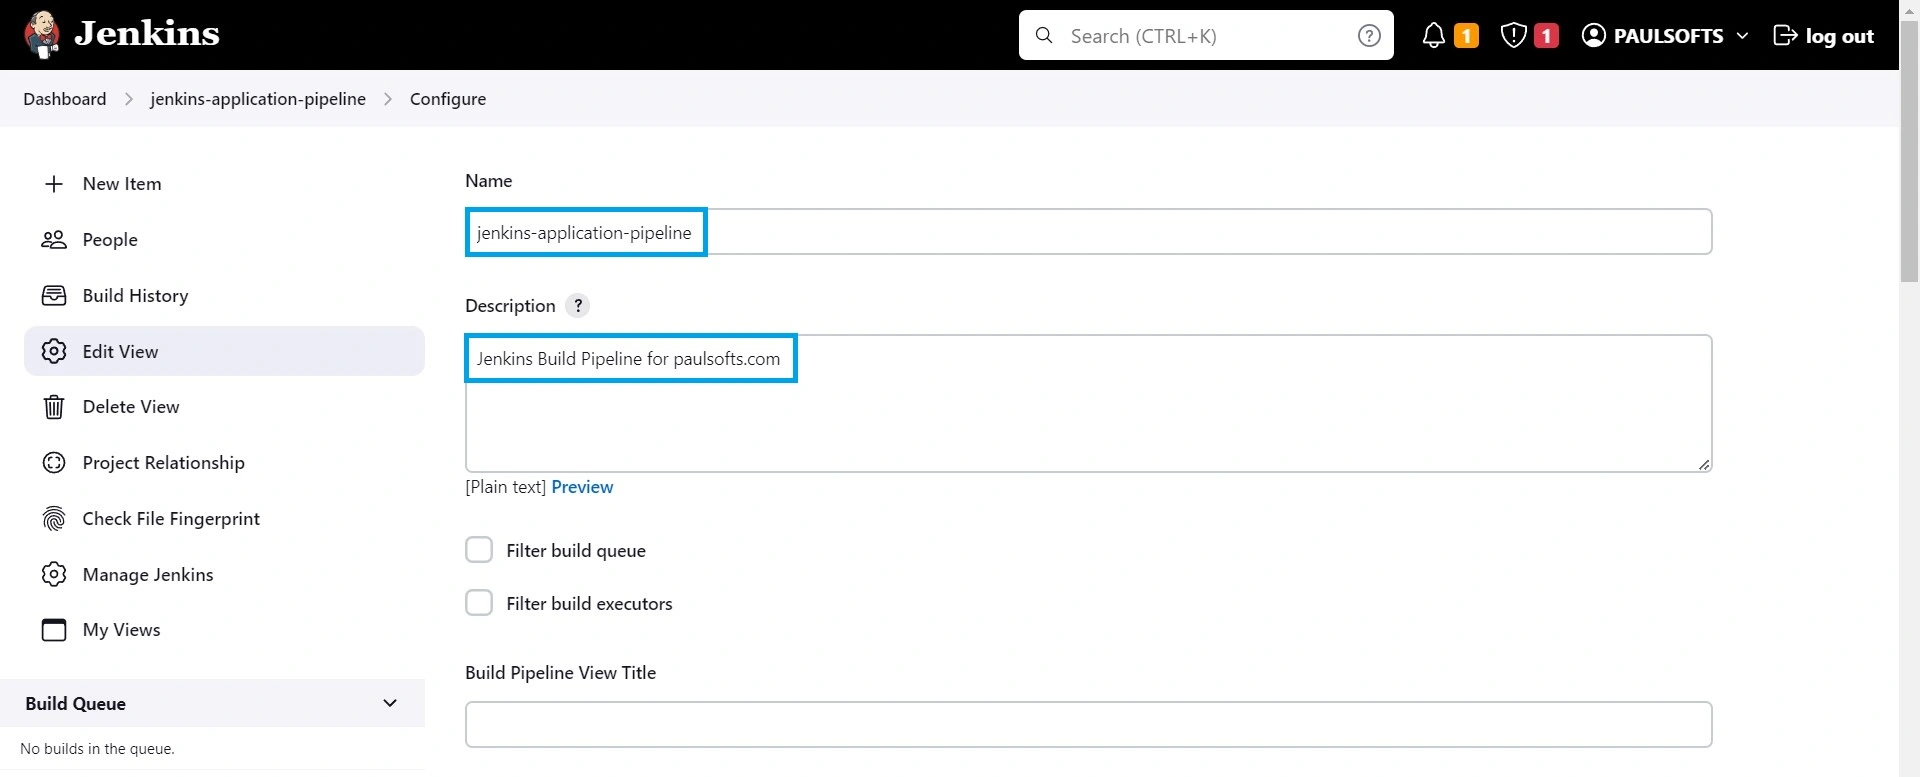
Once we click on Create, Jenkins opens a new window for our pipeline configurations. We are going to use the following details to configure our Jenkins pipeline, and apart from these details, we will keep them as default.
| Fields | Value |
| Name | jenkins-application-pipeline |
| Description | Jenkins Build Pipeline for paulsofts.com |
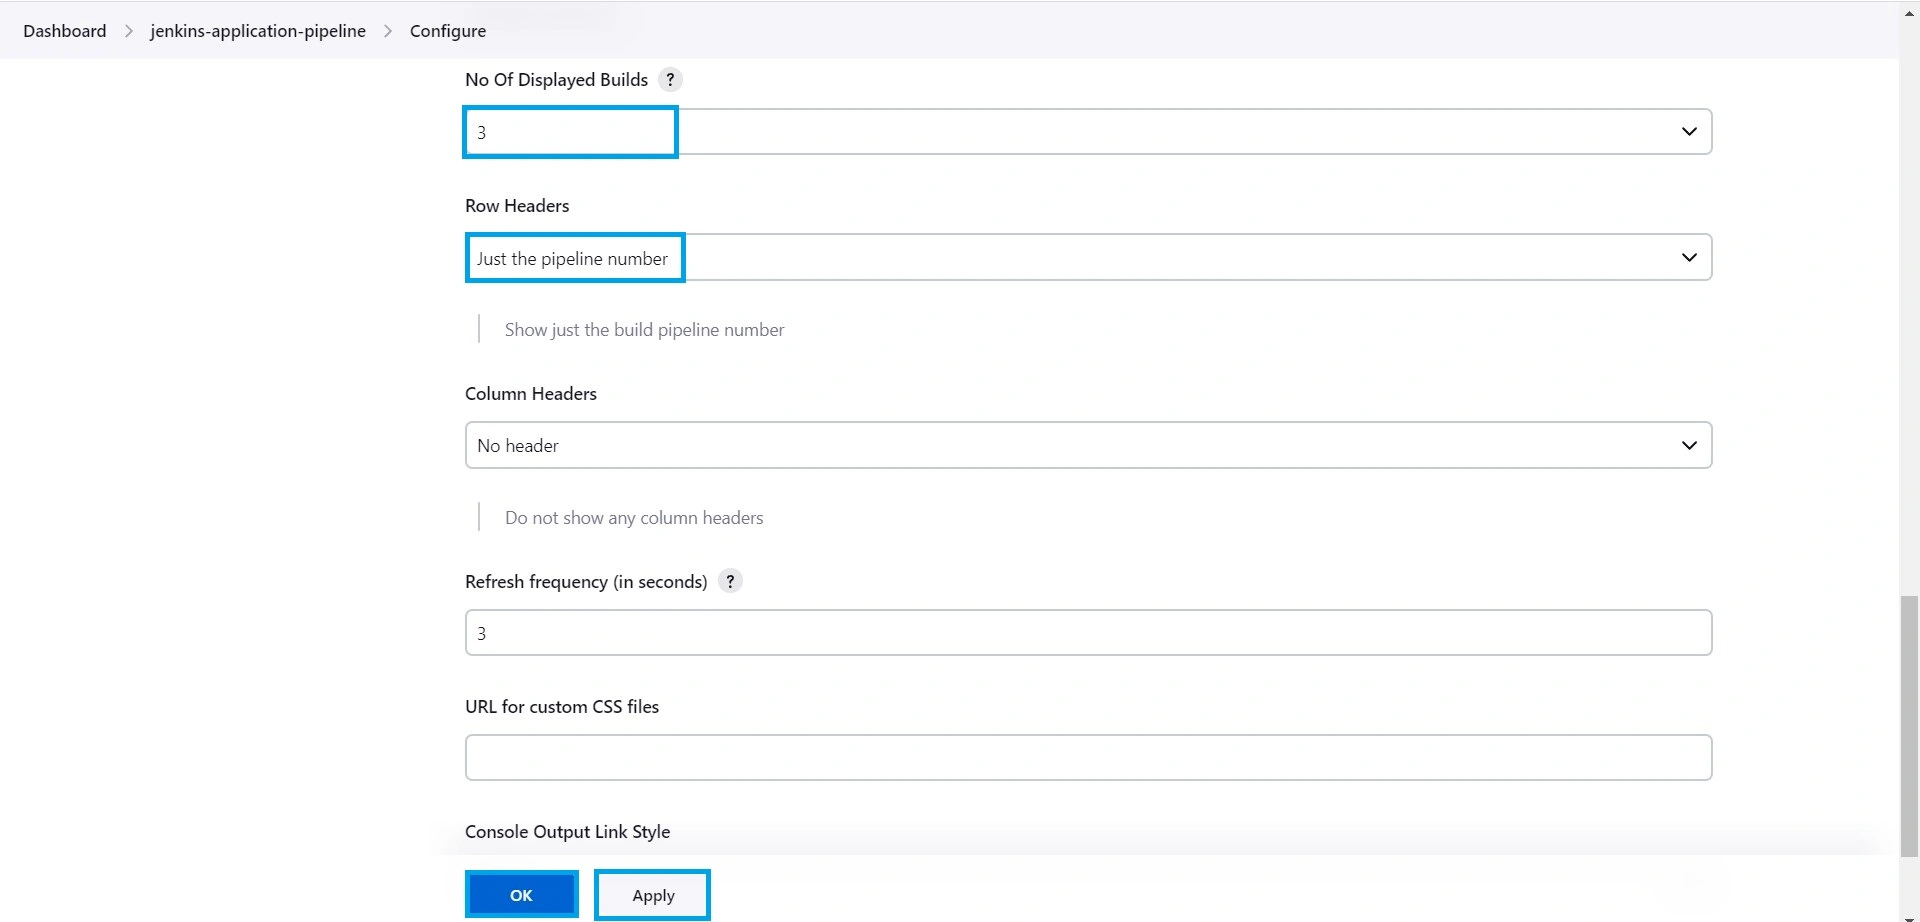
| Select Initial Job | DEV |
| No of Displayed Builds | 3 |
| Row Headers | Just the pipeline number |
Note: Initial Job represents which job we want Jenkins to build first whenever any code change is pushed to our source code repository.

After we added the required pipeline configuration, we needed to click on Apply and then OK. Jenkins will create the pipeline for DEV environment.

Step 3.2 Configure UAT in Jenkins pipeline
Above, we have configured DEV in our pipeline. Now that our DEV build is complete, we want to begin our UAT build. For this, we need to configure our UAT environment. For this, go to Dashboard > UAT Job > Configure.
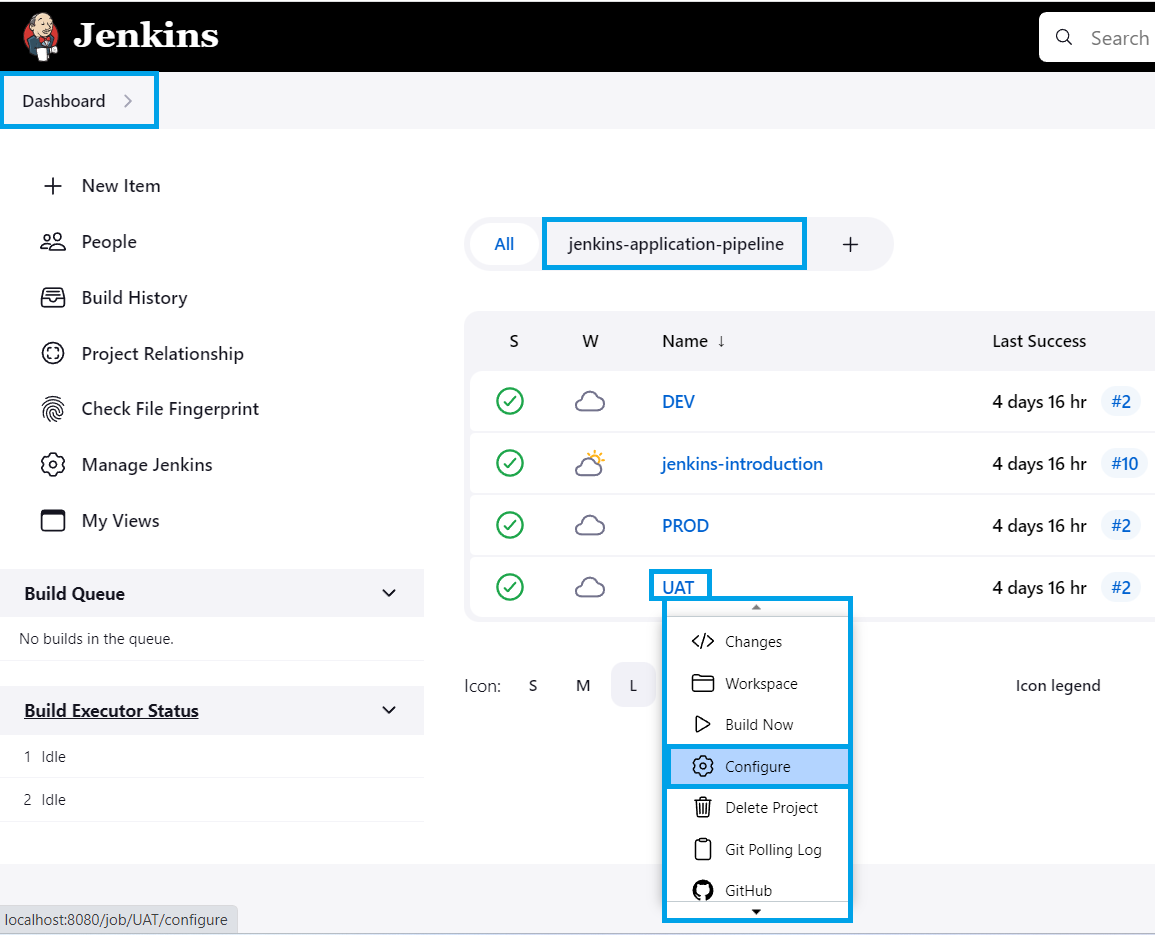
After we click on Configure, it will open the configuration window where we need to configure UAT to be built after our DEV build is completed. For this, go to Build Triggers > Select Build after other projects are built > DEV.
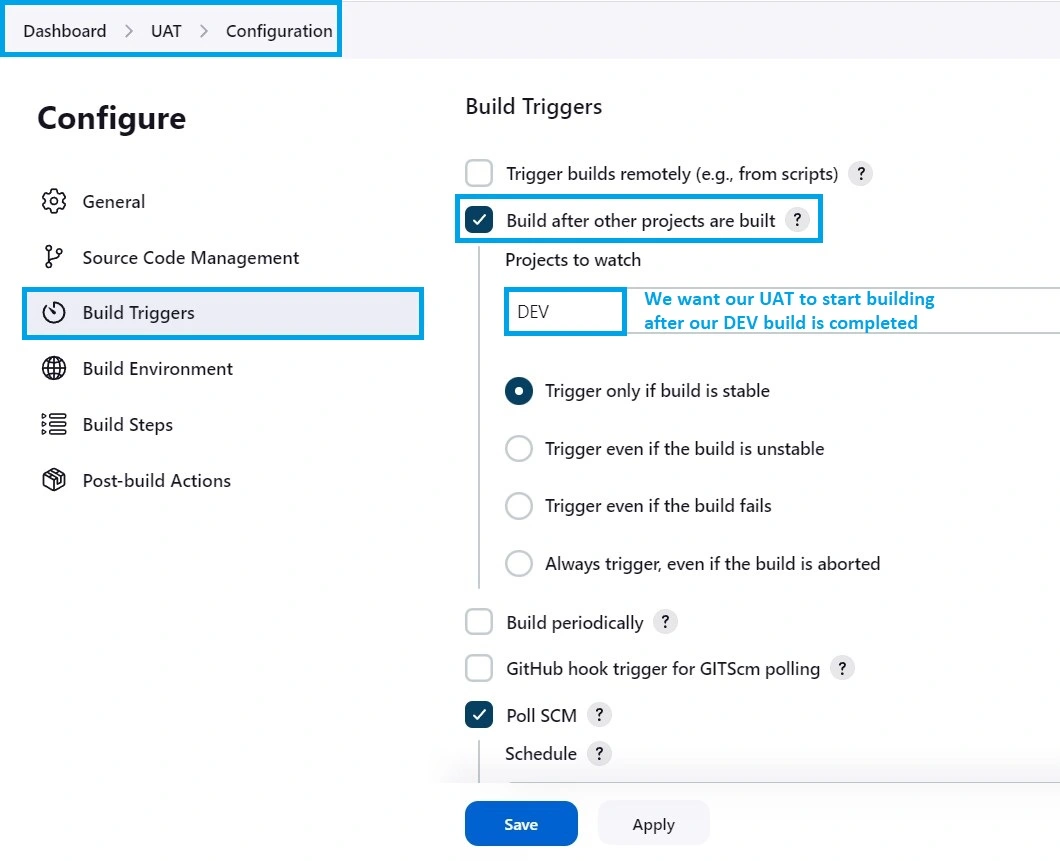
Once we have added the required configuration, we need to click on Apply and then Save. After this, we can go to Dashboard and click on our jenkins-application-pipeline view, and our UAT will also get configured to our pipeline along with DEV.
Step 3.3- Configure PROD in Jenkins pipeline
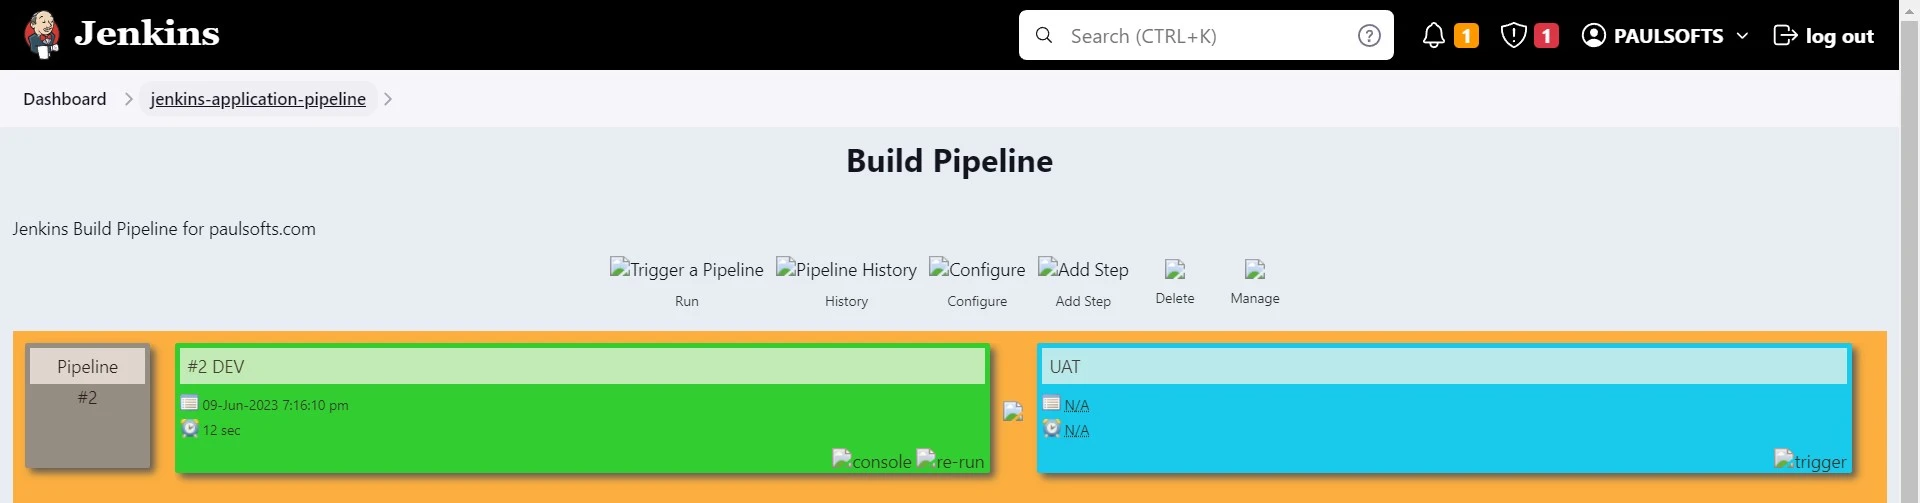
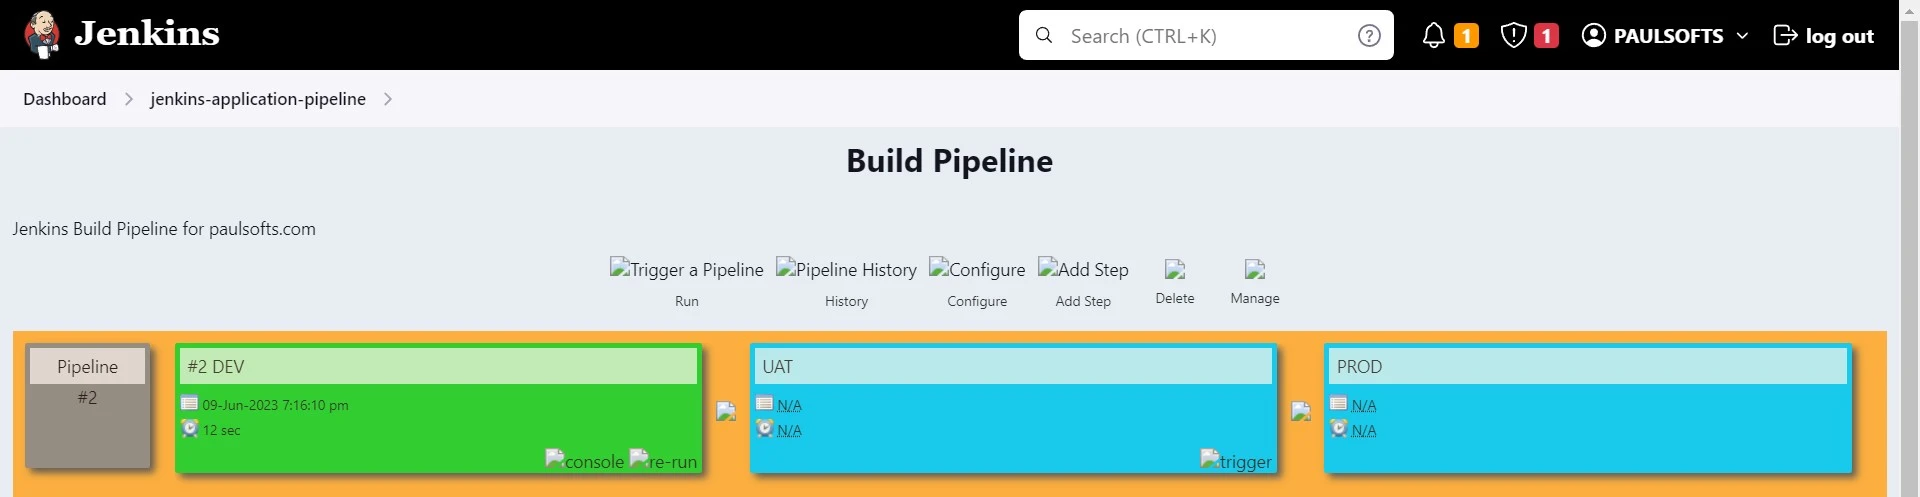
Similar to Step 3.2, we need to configure PROD for our jenkins-application-pipeline. Make sure to add UAT to the Build after other projects are built. So, that PROD will start its build when the UAT build is completed. After we have configured our pipeline for DEV, UAT and PROD we will have the following pipeline structure.
Step 4- Jenkins pipeline workflow
In this step, we will add some code changes to our source code repository to check the workflow of our pipeline. As soon as we push the code changes to our source code repository (Git or SVN), Jenkins will start the build process. First, DEV is started once it is finished, then UAT and then PROD. Please refer to the below screen recording for a clear understanding of the Jenkins pipeline workflow.
If the build stops at any of DEV, UAT or PROD, Jenkins will not move the code changes to the other jobs or pipeline; it will stop there and send a notification for a build failure.