

What is the JavaDoc Tool
The JavaDoc tool is a document generator tool that is used to generate standard documentation in HTML format. JavaDoc comes along with the Java Development Kit (JDK) and generates the API documentation for Java codes and provides information about classes, methods, fields, parameters and other elements of the Java codes. Please refer JavaDoc Official documentation.
Benefits of Using JavaDoc Comments
- The JavaDoc is used to create HTML documentations and it is an standard way to document the Java classes, interfaces, methods and fields.
- It helps in collaboration with other teams making it easier for developers to easily understand the application codebase.
- The JavaDoc makes the application code more intuitive, maintainable and team friendly – especially in collaborative or long-term projects.
- In a microservices based application, documenting the REST endpoints using the JavaDoc helps both backed and frontend teams to stay aligned.
- It provides support to most IDEs such as Eclipse, IntelliJ IDEA, VS Code etc.
JavaDoc Comments in Java
In Java, we can add comments to our application or program in following ways:
- Single-line comment
- Multi-line comment
- JavaDoc comment
public class CommentsExample {

	// This is a Single-line comment


	/*
	 * This is a Multi-line comment
	 */


	/**
	 * This is a JavaDoc comment
	 */

}
Note: We can add as many comments as we want in our application; it does not affect the performance of our program because, at the time of compilation, comments are completely ignored by the Java compiler.
What are JavaDoc Tags
The Javadoc tags are the special annotations or directives used within Javadoc comments to provide specific information about the code elements being documented. These tags help in enhancing the clarity and completeness of the generated documentation. Below are few of the JavaDoc tags examples.
@author
The @author tag is a Javadoc tag used to document the author of the class, interface or methods. It helps in identifying who wrote or modified a particular piece of code.
/**
 * Represents a utility class for string operations.
 *
 * @author ankur.pal
 */
public class StringUtils {

    /**
     * Reverses the given string.
     *
     * @param input the string to reverse
     * @return the reversed string
     * @author paulsofts
     */
    public static String reverse(String input) {
        return new StringBuilder(input).reverse().toString();
    }
}
When to Use:
- When we introduce a new class in an application, we can add @author annotation at class level.
- While adding a new method or modifying an existing one, we can add @author author_name above the method’s Javadoc comment.
@return
The @return tag in Javadoc is used to explicitly describe the return value of a method.
/**
 * Retrieves a list of users whose annual income exceeds ₹10 lakhs.
 *
 * @return List<User> a list of high-income users
 */
public List<User> getHighIncomeUsers() {
    // implementation
}
When to Use:
- It is generally used when the return type is not immediately obvious or when we want to provide additional context to improve code readability.
@param
It is used to document the parameters a method accepts. It provide a clear description of what each parameter is used for, helping other teammates understand the method’s purpose and how to use it correctly.
/**
 * Calculates the tax based on the provided income and tax rate.
 *
 * @param income the annual income of the individual
 * @param taxRate the applicable tax rate in percentage
 * @return the calculated tax amount
 */
public double calculateTax(double income, double taxRate) {
    return (income * taxRate) / 100;
}
When to Use:
- When to want to explain what parameters are acceptable by the method.
- It is used to document only methods and constructors.
How to Write JavaDoc Comments in Java
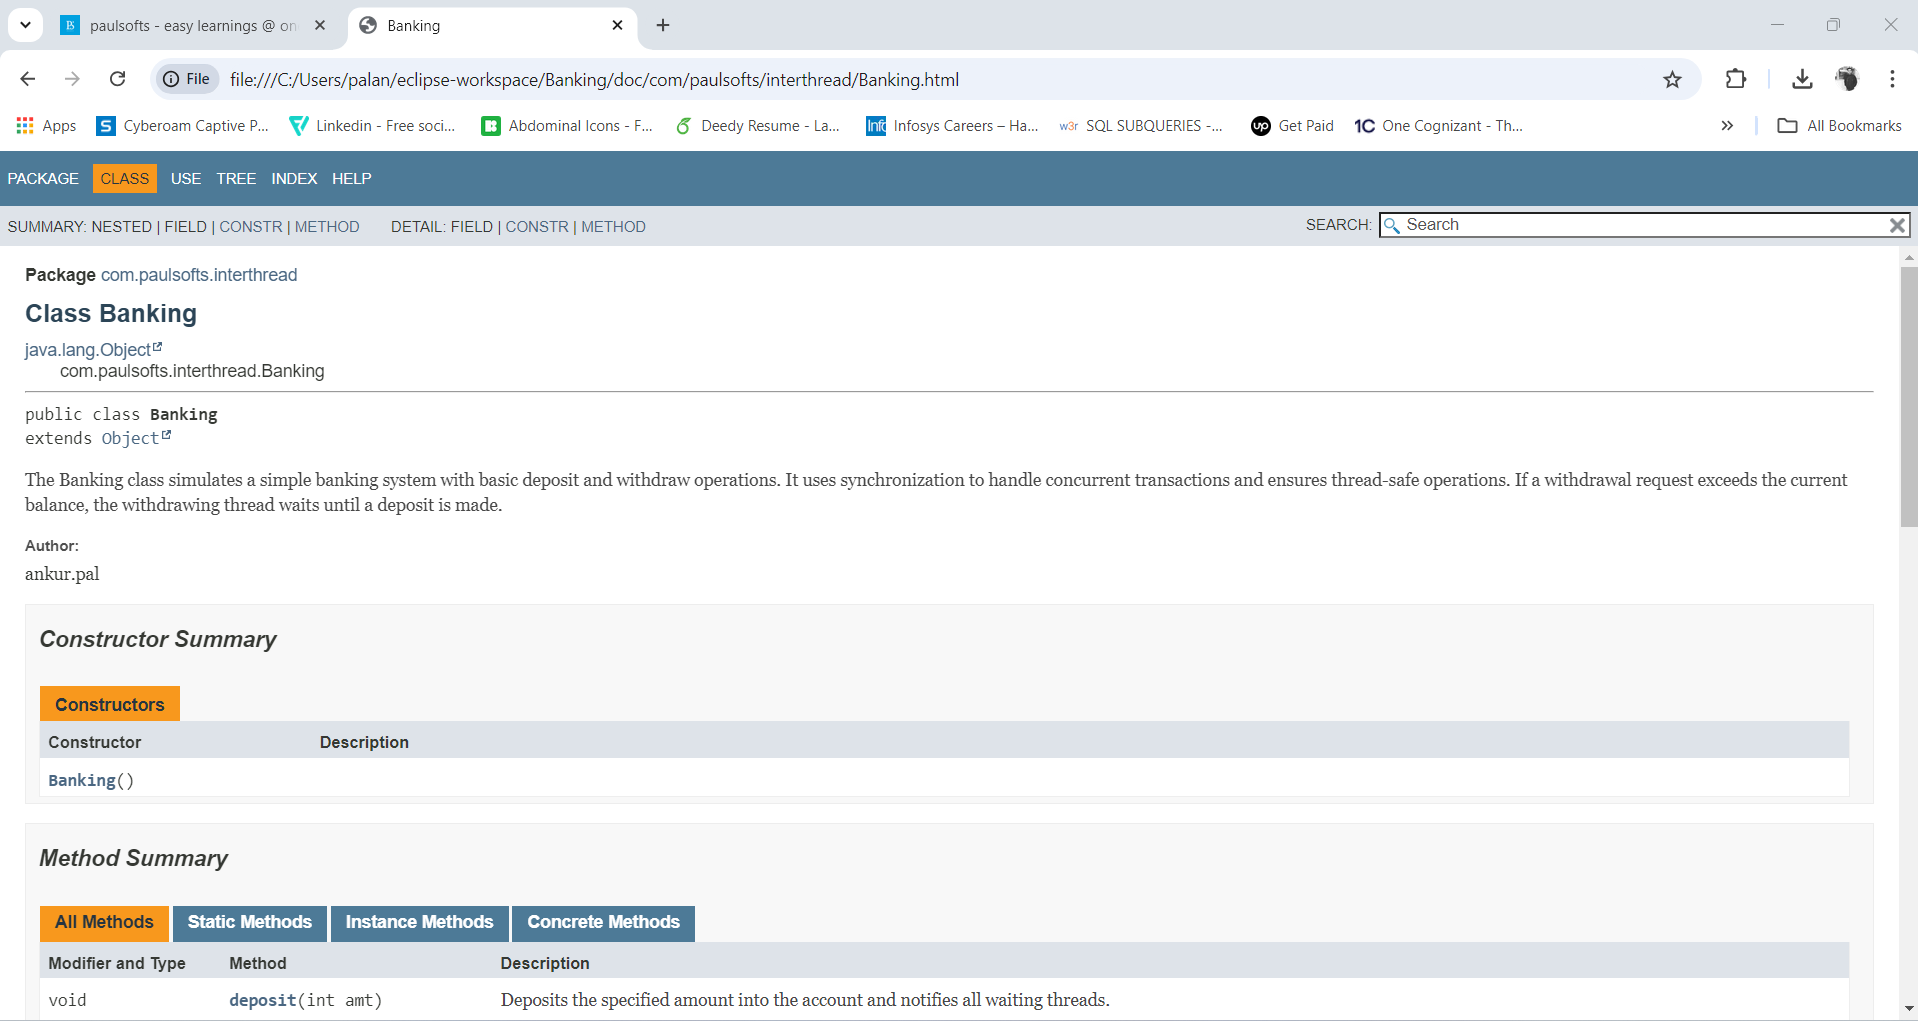
Below, we have an example of inter-thread communication. We have added the required comments to our banking class.
/**
 * The Banking class simulates a simple banking system with basic deposit and withdraw operations.
 * It uses synchronization to handle concurrent transactions and ensures thread-safe operations.
 * If a withdrawal request exceeds the current balance, the withdrawing thread waits until a deposit is made.
 *
 * @author ankur.pal
 */
public class Banking {

    /**
     * The initial balance in the bank account.
     */
    int balance = 1000;

    /**
     * Withdraws the specified amount from the account.
     * If the balance is insufficient, the thread waits for a deposit to be made.
     *
     * @param amt the amount to withdraw
     * @throws InterruptedException if the thread is interrupted while waiting
     */
    public synchronized void withdraw(int amt) throws InterruptedException {
        // If balance is less than the withdrawal amount, wait for a deposit
        if (this.balance < amt) {
            wait();
        }
        // Deduct the amount from the balance
        this.balance -= amt;
        System.out.println("Balance after withdrawal: " + this.balance);
    }

    /**
     * Deposits the specified amount into the account and notifies all waiting threads.
     *
     * @param amt the amount to deposit
     */
    public synchronized void deposit(int amt) {
        // Add the amount to the balance
        this.balance += amt;
        // Notify waiting threads that a deposit has been made
        notifyAll();
        System.out.println("Balance after deposit: " + this.balance);
    }

    /**
     * The main method simulates a concurrent banking scenario where one thread tries to withdraw
     * an amount greater than the current balance, while another thread deposits an amount.
     *
     * @param args command-line arguments (not used)
     */
    public static void main(String[] args) {
        Banking banking = new Banking();

        // Thread to perform a withdrawal of 1500
        new Thread("withdraw-thread") {
            public void run() {
                try {
                    banking.withdraw(1500);
                } catch (InterruptedException e) {
                    e.printStackTrace();
                }
            }
        }.start();

        // Thread to perform a deposit of 1000
        new Thread("deposit-thread") {
            public void run() {
                banking.deposit(1000);
            }
        }.start();
    }
}
How to Generate JavaDoc in Eclipse
We can generate Javadoc using any IDE as it came integrated along with JDK. For this example, we will be using Eclipse. A similar process is there for Intellij IDE also.
Step 1: First, we need to go to Project and click on Generate Javadoc.

Step 2: Once we click on Generate Javadoc, it will open a popup window where we are required to choose the project for which we want to generate API documentation and the destination where we want our documentation to be generated.

Step 3: After we click Finish, it will generate the API documentation in HTML format at the specified destination.

Step 4: Test
We can verify our HTML documentation over the specified location and can be used with the index.html webpage to visualize the complete documentation. We also navigate to CLASS, USE, TREE, and INDEX navigation to get complete details. documentation in HTML format at the specified destination.
Hello.
Good cheer to all on this beautiful day!!!!!
Good luck 🙂